
The Last Starship is a sandbox spaceship management game being developed by Introversion Software and is currently in early pre-alpha playtest. For this reason, there is currently relatively little guidance on getting started with the game.
Contents
Demo / New Game
In the Demo version of the game, only the standard game is available. Players are only able to select the basic Praxis ship to start out.
Setting up the Praxis
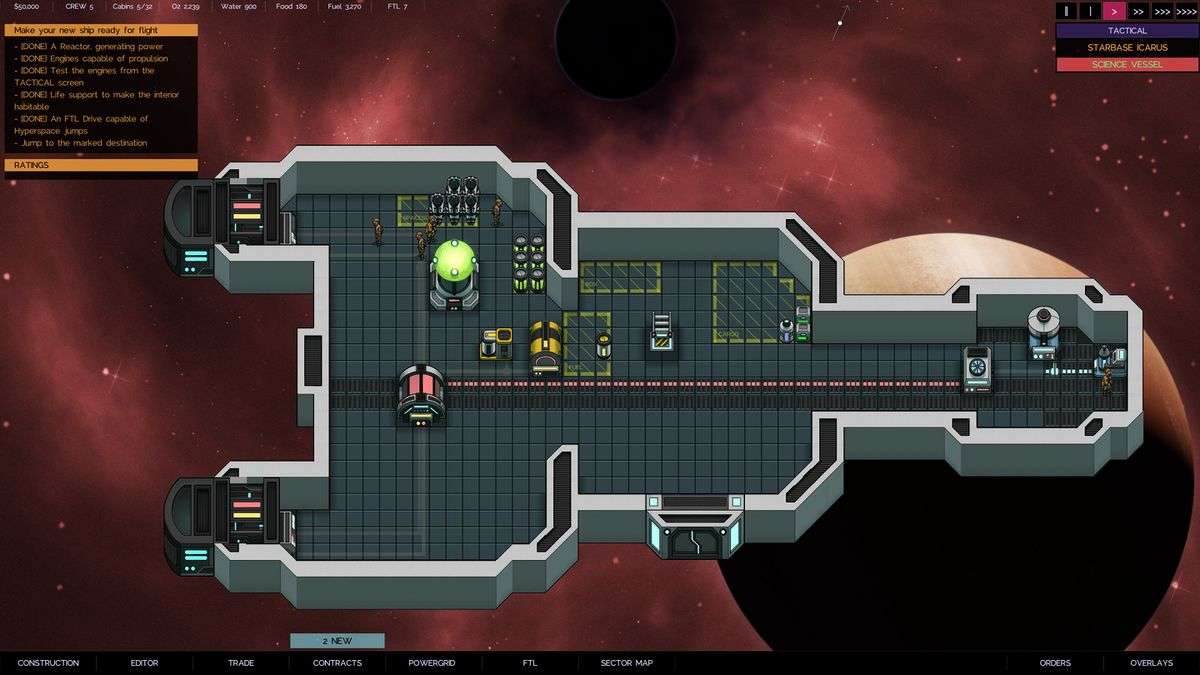
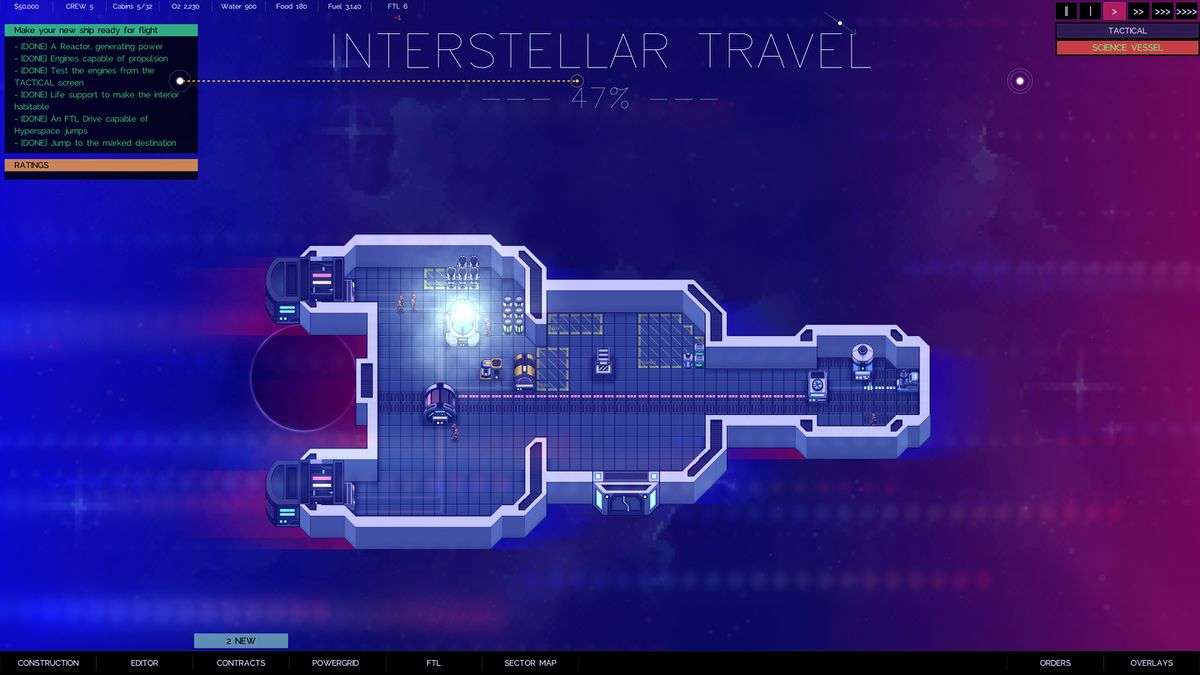
After beginning the game with the Praxis you will find yourself with a basic ship layout, stocked with a handful of starting resources and 5 crew members. The following steps will get you from an empty ship to one which has completed the starting contract ‘Make your new ship ready for flight’ by successfully jumping to the next system.
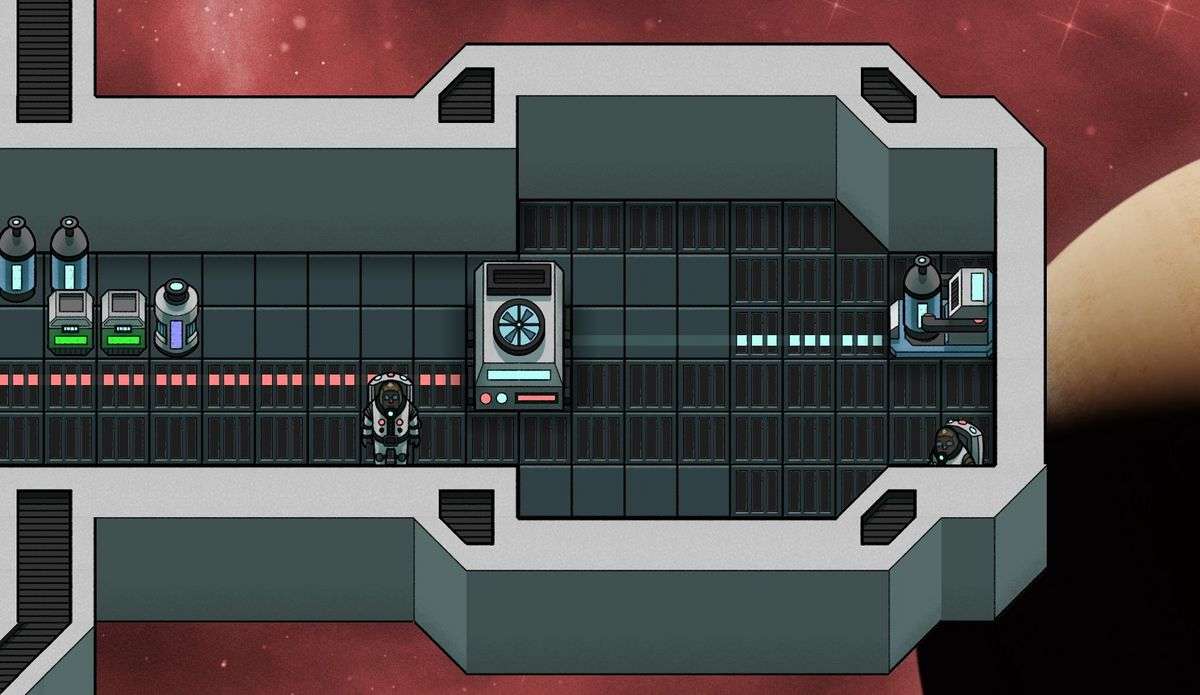
First, follow the guidance drawn on the ship floor to install your Reactor and a Loader, by clicking the Construction menu in the bottom-left corner of the screen and selecting Install. Click the equipment to select it, then place it in the designated position.
In the Construction menu, select Install and then click the Reactor object.
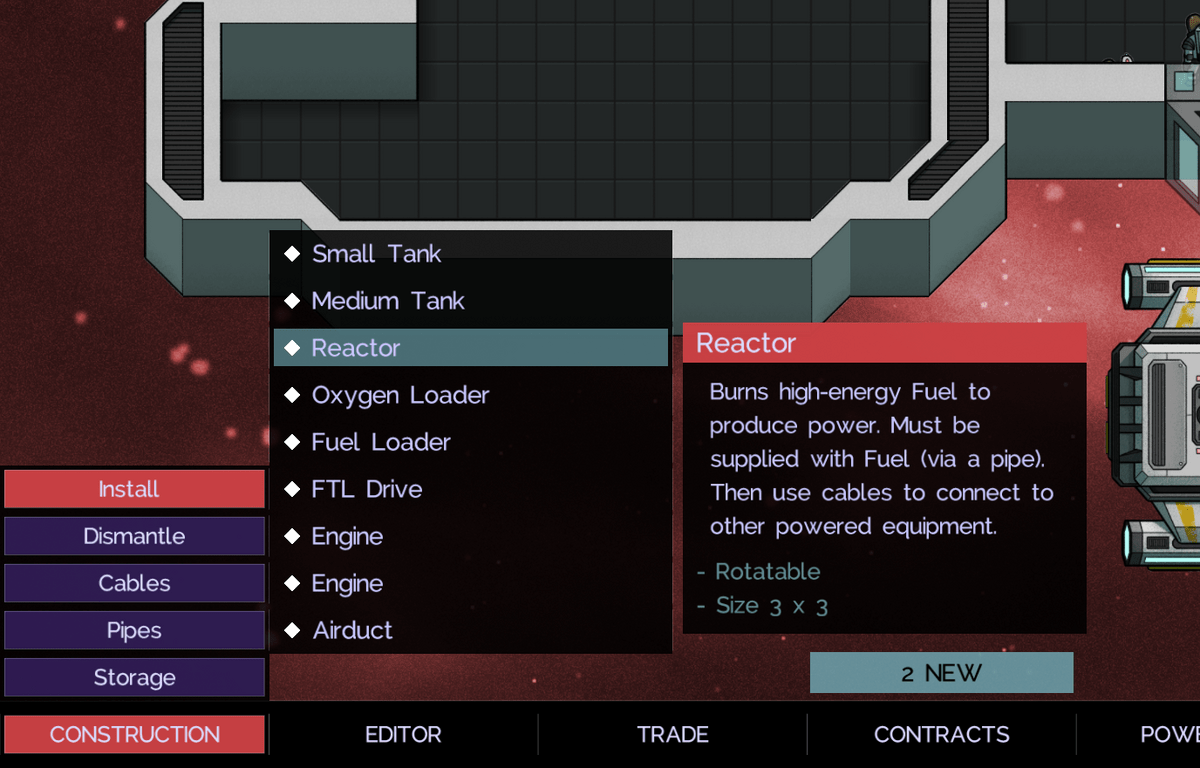
Install the Reactor, then do the same for the Loader. Connect the two with pipes via the Pipes button in the Construction menu.
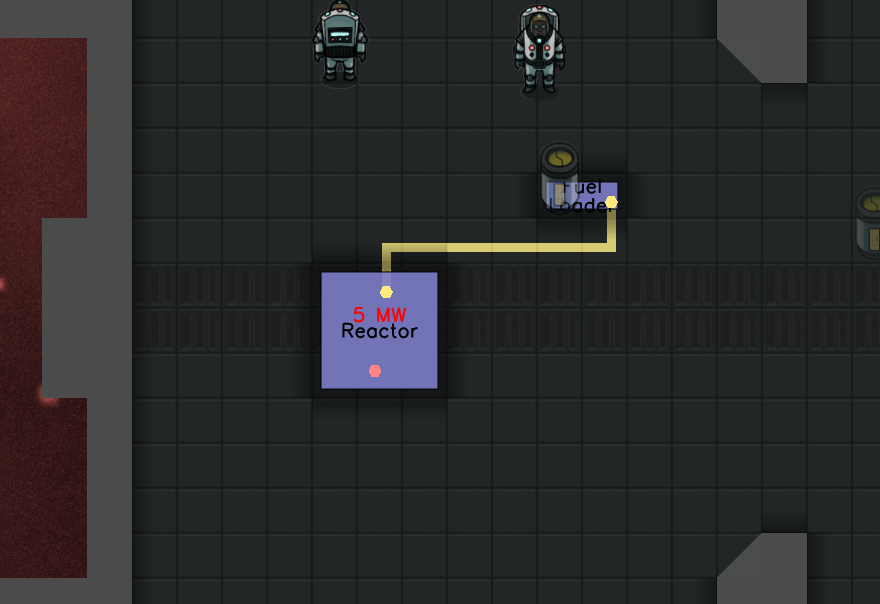
Your crew should load fuel into the Loader, and the Reactor should come to life shortly thereafter.
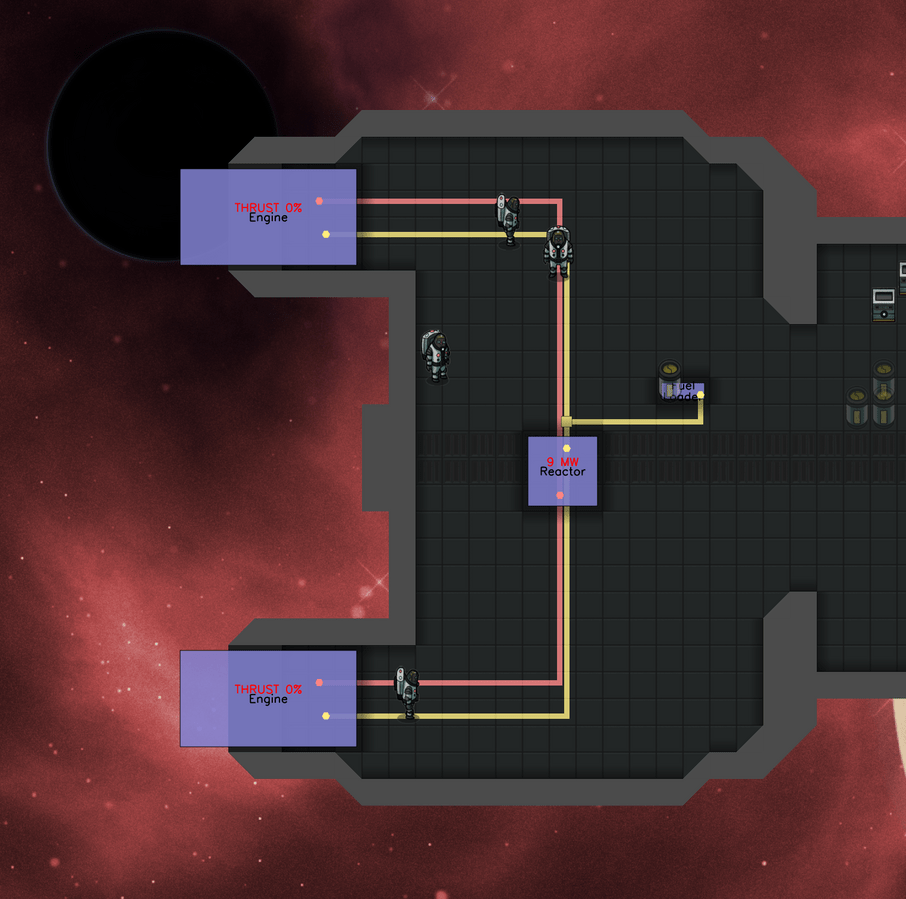
Next, we need to install engines, or this ship isn’t going anywhere. From the Install menu, select one of the Engine objects, and install it in on the left side of your ship (engines cannot be rotated).
Reactors need both power and fuel inputs, so connect them to your existing Pipes, and plug them in to your Reactor with cables.
Engines can be installed on vertical walls wherever the highlight is green.
Install cables and pipes to connect the engines to the Reactor and Loader.
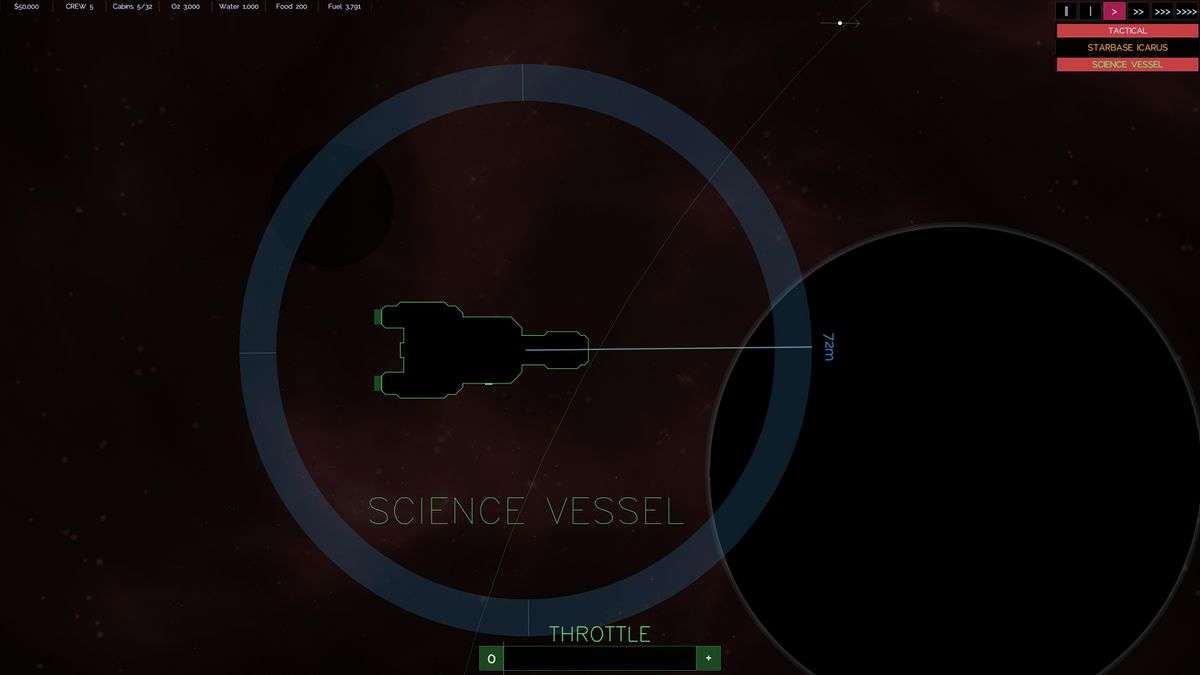
Your ship can now move! Press T, or click the Tactical button in the top right, to enter tactical view. From here, you can click to rotate your ship in a direction, and use the Throttle bar at the bottom to control your engines. Right clicking on the screen will have your crew fly your ship to that location.
The tactical view is where you’ll be spending most of your time during combat missions!
So you’ve got a ship that can fly. Unfortunately, your crew are still stuck in their spacesuits, because there’s no oxygen inside the ship. To get them comfortable, we need to install the Oxygen Loader and Airduct. After installing both, connect the Loader output to the Airduct input with Pipes.
The Airduct and Loader. They can be placed anywhere on the ship.
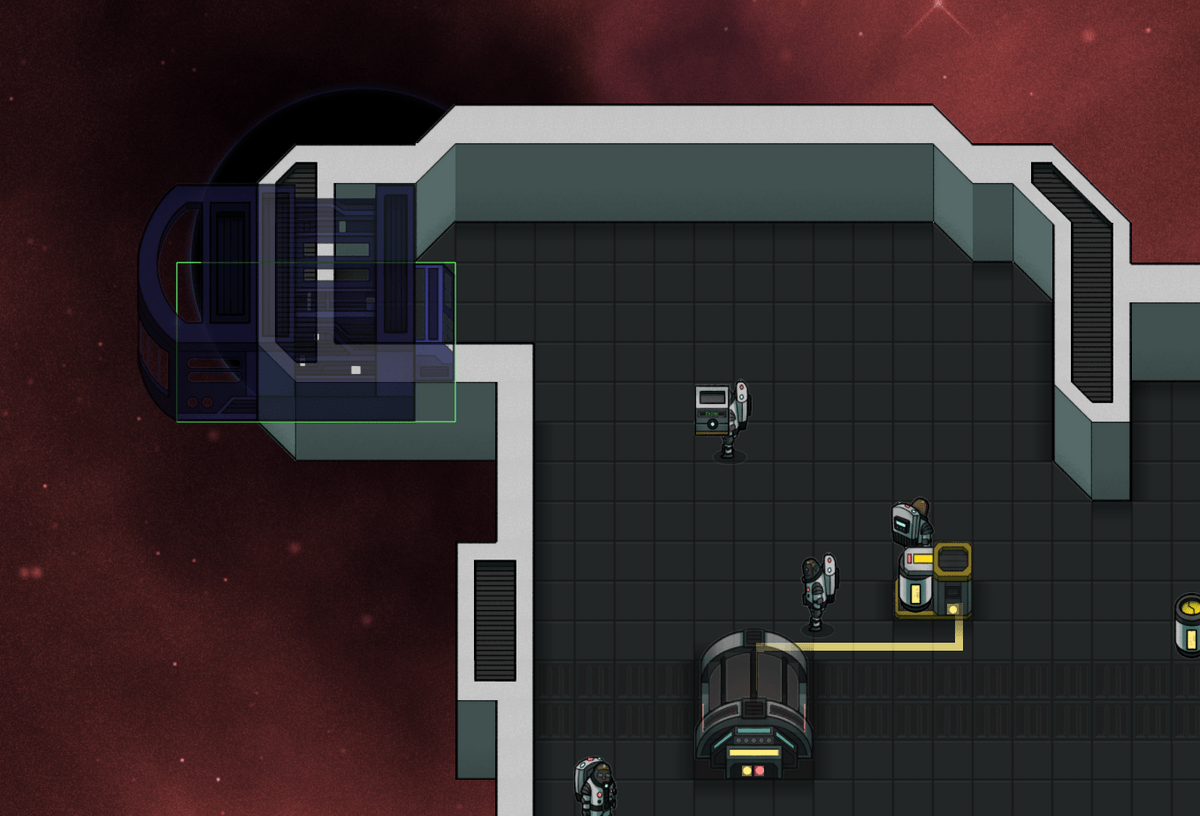
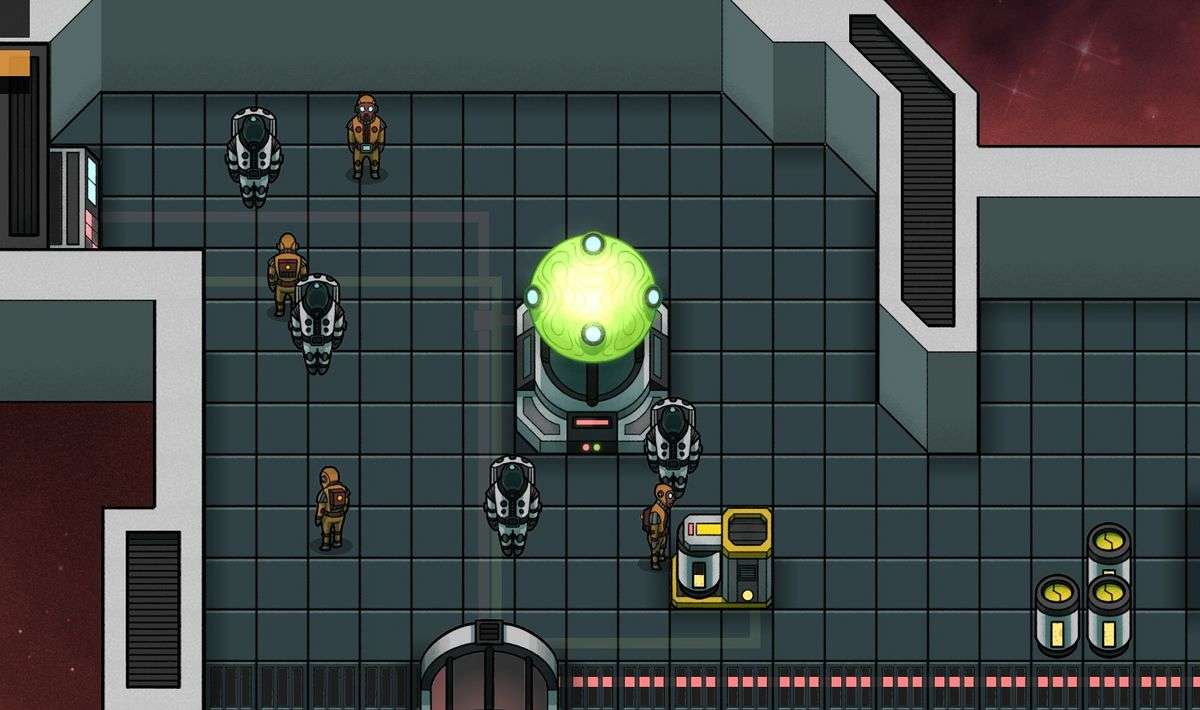
Although your ship can now move around, it can’t yet reach other star systems. To do so, it will need an FTL Drive, so get your crew installing one anywhere on your ship.
The FTL Drive will be loaded with special FTL Charges. Make sure you don’t run out!
Although you now have a ship capable of manoeuvring and jumping between systems, there are two more things to do before we proceed: installing tanks and designating storage areas. If you’ve had your Reactor running for long enough you might have noticed a brief power cut as the Fuel ran out and had to be swapped out for another one by a crewmember. This causes a break in your engine power and requires them to charge up again. You don’t want that happening in the middle of a fight! To remedy this, we can install the Medium Tank and connect it to the fuel pipes. The tank will fill up with excess Fuel, and keep things running when your Fuel needs swapping out, ensuring the smooth running of your ship. We can also install the Small Tank between the Oxygen Loader and the Airduct.
The Medium Tank can be placed anywhere as long as it’s connected to the fuel pipes.
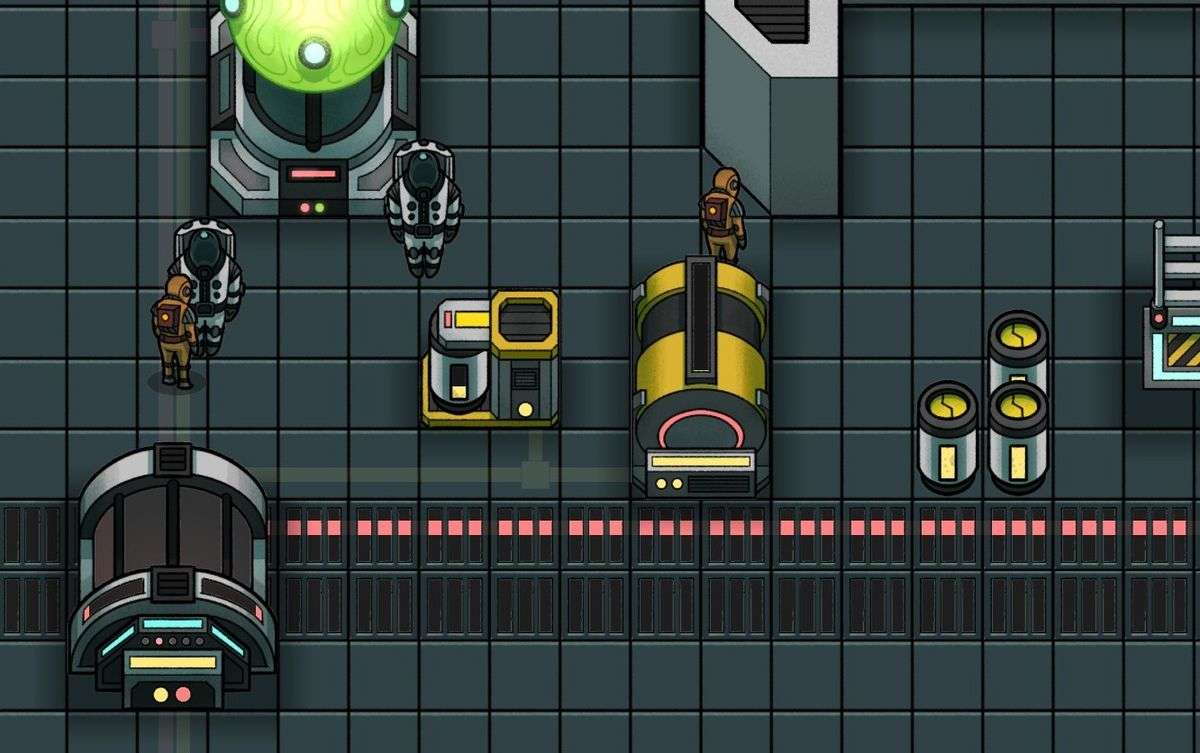
We don’t need to worry as much about brief downtime with the Oxygen supply, so we’ll just use a small tank.
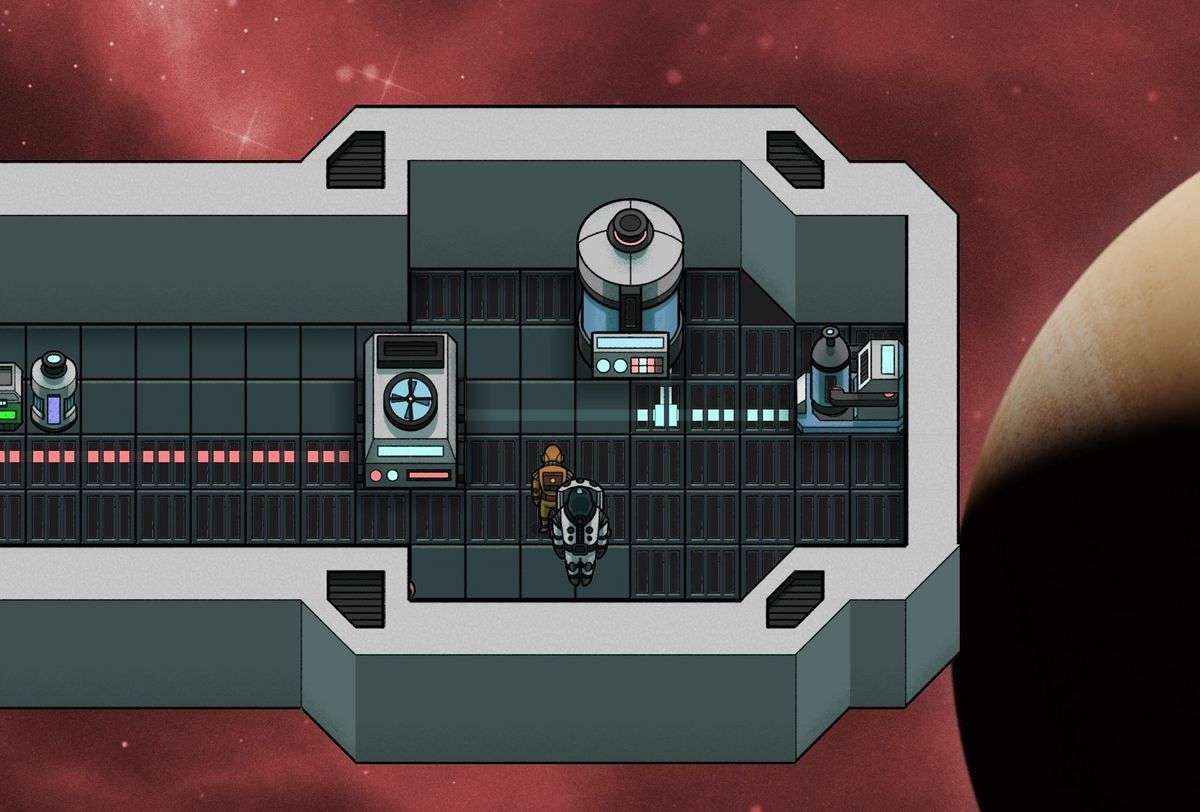
Lastly, your crew have left their spacesuits around the ship and you still have a handful of supplies sat around in the open. We can designate storage areas to tidy these away closer to where they’ll be used. Click Construction and then Storage. You can designate storage areas for specific items, or for Equipment (the things you’ve been installing on your ship), or for all ship cargo, which includes items you pick up for transport during the game. For now, just designate storage areas for Spacesuits, Fuel, Oxygen, FTL Charges, Equipment, and Cargo.
It’s helpful to place storage areas for resources like Fuel close to where they’ll be loaded.
You’ve now got a fully functional ship! Make sure to keep it well stocked with the essentials – FTL Charges, Fuel, Oxygen, Food, and Water.
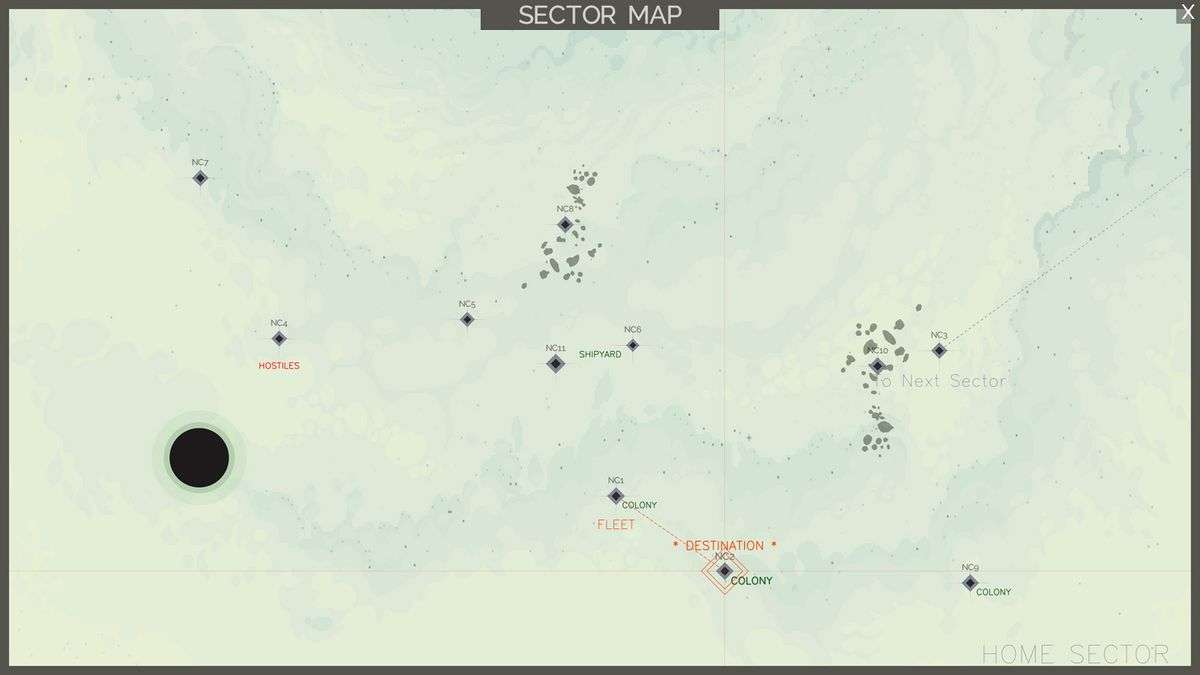
To jump to the next system, press M or click the Sector Map button at the bottom of the screen. Click a sector to lock it in, then close the window by pressing M or clicking the X in the top right.
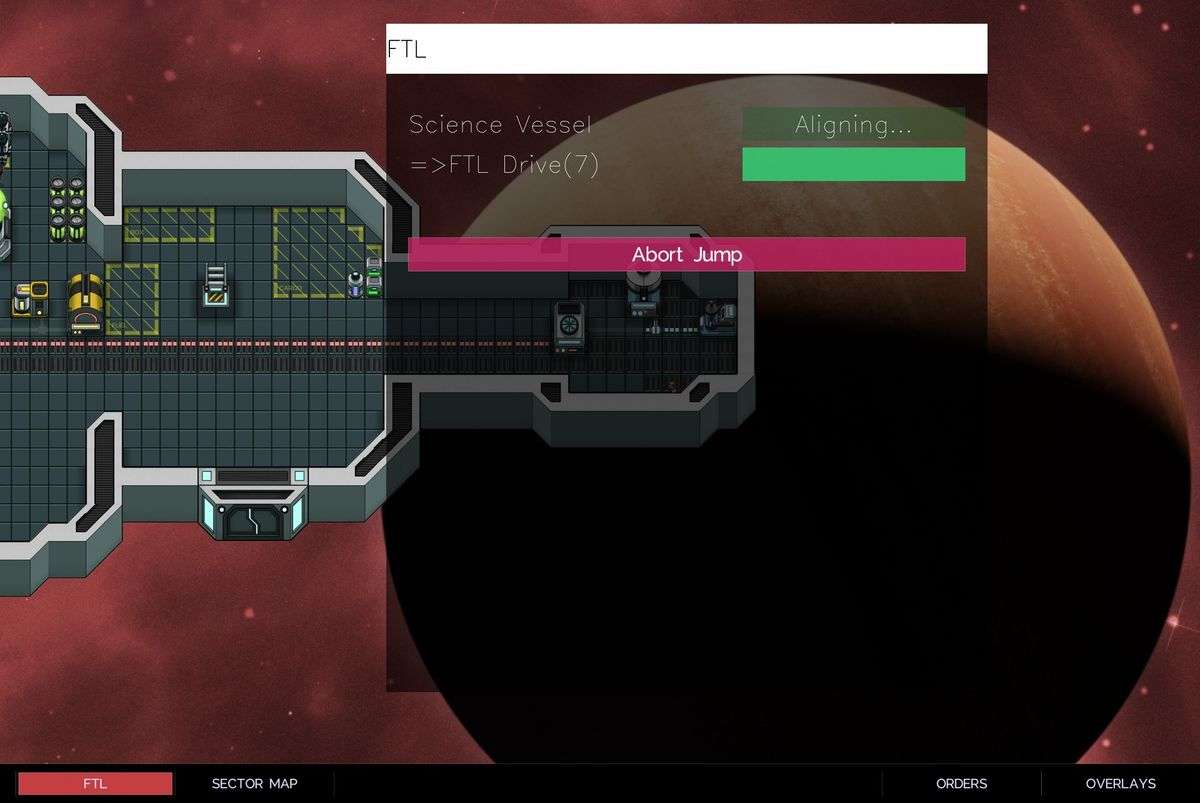
Next, click the FTL button and Prepare Jump. Your ship will orient in the correct direction, and the Jump button will become visible. Click it to begin your journey!
At the start of the game you will have a specific first destination marked. After that, your destination is up to you!
Your ship will need to orient before the Jump button is shown.
Enjoy the game!
Playtest / Creative Mode
Creative mode enables editors to build a ship without regard for cost of the components, and is the only mode available in the Playtest version of the game.
Building Your First Ship
At the start of a normal game, you have only an empty vessel in a system with trade and story contracts, but no shipyard. The exceptions are the The Praxis, which starts with some materials, and Shipyard, which starts the game in a system with a shipyard. A few crew members in space suits arrive via shuttle in the first few moments of the game, and it is up to the player to turn this vessel into a functioning ship.
The Make your new ship ready for flight contract involves setting up these systems, and is accepted by default. It is also a good idea to skim the rest of this article. It is currently impossible to rotate engines. Therefore, it is essential to plan the layout to account for this.
A grey hint layout is shown in the Praxis ship, initially just displaying a Reactor, Fuel Loader, and adjoining pipes, to guide players installing their first equipment.
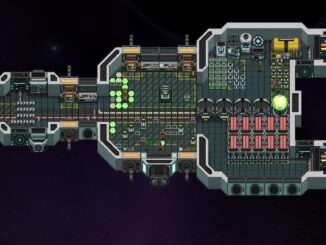
A tutorial on Ship Editor, showing how to build a functioning ship from nothing.
Power
Before installing any systems, you must have power on the ship. Almost every piece of equipment available requires a source of power. If you selected the Praxis vessel, you should already have some or all necessary items. Otherwise, purchase the following items from the Trade screen.
- Reactor
- Loaders
- Fuel
Place the reactor and one loader together somewhere in your vessel’s interior. It may be most efficient to place this close to where you intend to build your engines, as the reactor and engines are the main components that require fuel. Connect the reactor’s fuel connector to the loader’s output. A crew member should immediately pick up a fuel canister and deposit it on the loader. After a moment of spinup, your reactor will spring to life, ready to provide power to your ship.
Atmosphere
The crew members have enough oxygen to survive without an atmosphere for several minutes, so there is some flexibility in the order that the player can build systems. That said, a working atmosphere means the player doesn’t need to rush and can lay things out the way they want. Therefore, we will begin by establishing essential Life Support. Purchase the following items from the Trade screen:
- Airduct
- Loader
- Oxygen
Similarly to how we set up our power system, place the airduct and loader together. Connect the airduct’s oxygen connector to the loader’s output and the power connector to the reactor’s power output. Once a crew member has loaded an oxygen canister into the loader, your airduct will begin pumping that oxygen into the ship’s atmosphere.
You can select the Atmosphere overlay to see the interior change from a lattice pattern to red horizontal lines. The lines will progress towards green and expand to fill their tiles as oxygen fills the atmosphere. Once the atmosphere is sufficient to sustain them, the crew members will begin to remove their space suits and transfer them to the cargo storage area. Keeping the space suits on hand is good in a hull breach during battle or if there is a blockage in your life support system.
Propulsion and FTL
Propulsion and FTL are necessary for your ship to travel within and between systems in a sector and to progress to new sectors. Purchase the following items from the Trade screen:
- Engines – The size of a ship affects its mass and inertia, so large ships require more engines than smaller ships. Two engines are a good start for the Praxis and Sleek vessels.
- FTL Drive
Engines must be placed into the ship’s outer hull, with propulsion directed to the left of the screen. It is currently not possible to rotate engines. Once they are placed, connect the engine’s power and fuel connectors to the same pipe and cable setup from your reactor.
In addition to engines and FTL, installing some thrusters on your ship is also a good idea. Thrusters allow for fine motor control during Combat or when mining asteroids or docking with ships.


Be the first to comment