
Many of the interactive features and operational gauges that are present on this train are displayed in the DB BR 403 ICE 3 cab layout. Not every control is necessary to run this train.
DB BR 403 ICE 3 Cab Layout – 1/3

- 1 – Contact Signaller Phone
- 2 – PZB Override Button
- 3 – PZB Release Switch
- 4 – PZB Acknowledge Switch
- 5 – Pantograph Switch
- 6 – Main Circuit Breaker Switch
- 7 – AFB Speed Handle
- 8 – Reverser Switch
- 9 – Throttle Handle
- 10 – Cab Lights Switch
- 11 – Headlights Switch
- 12 – Sand Switch
- 13 – Horn Lever
- 14 – Train Brake Handle
- 15 – Coupling Control Button
- 16 – Door Control Switch
- 17 – Wiper Switch
- 18 – Emergency Stop Button
- 19 – Wiper Speed Switch
- 20 – Right Multi-Function Display
- 21 – Multi-Function Display Screen Selector
- 22 – Multi-Function Display (Tractive Effort)
- 23 – Multi-Function Display (Speedometer)
- 24 – Indicator and Gauge Brightness Switches
- 25 – Left Multi-Function Display
DB BR 403 ICE 3 Cab Layout – 2/3
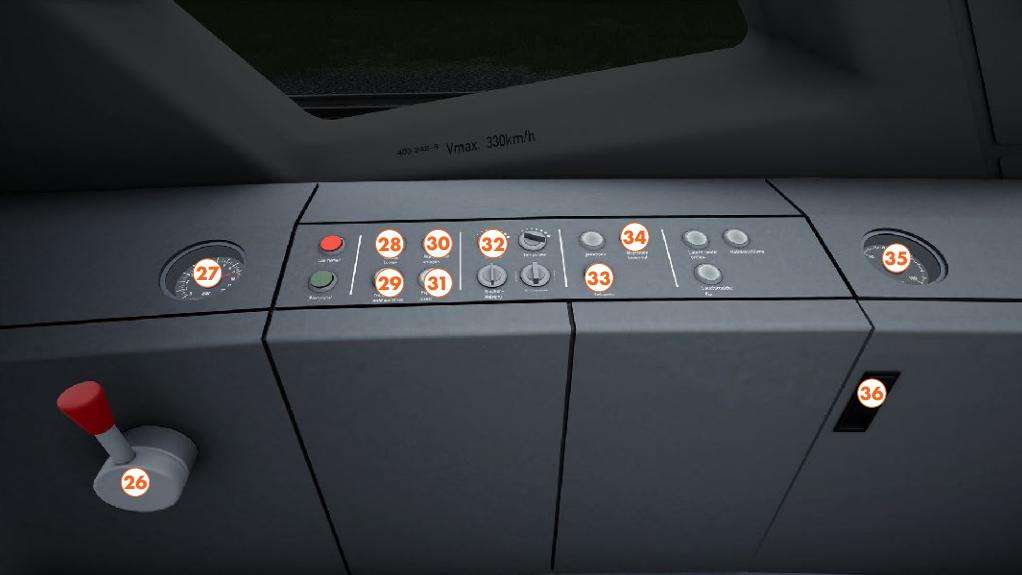
- 26 – Emergency Brake Handle
- 27 – Emergency Brake Gauge
- 28 – Lounge Window Opacity Button
- 29 – Passenger Door Step Override Button
- 30 – Apply Parking Brake Button
- 31 – Release Parking Brake Button
- 32 – Cab Air Con Switch
- 33 – Uncouple Button
- 34 – Open Rear Coupler Hatch Button
- 35 – Battery Voltage Gauge
- 36 – Side Cabinet Panel Door
DB BR 403 ICE 3 Cab Layout – 3/3

- 37 – SIFA Isolation Switch
- 38 – PZB Isolation Switch
- 39 – LZB Isolation Switch
- 40 – Battery Switch

Be the first to comment