
Operations Guide
In Operations, you are commanding a single Regiment. Operations are split into a number of Phases, each representing several hours of real time.
Operations happen over several Stages, each representing a set of objectives in a given geographical area.
You’re tasked with taking or holding key objectives while adhering to the set time limits.
Operations are persistent and use a Save Slot system. Each slot can have a single active Operation. When the operation is concluded, you can review the final stats, re-run it from any phase save, or clear it and start a new operation.
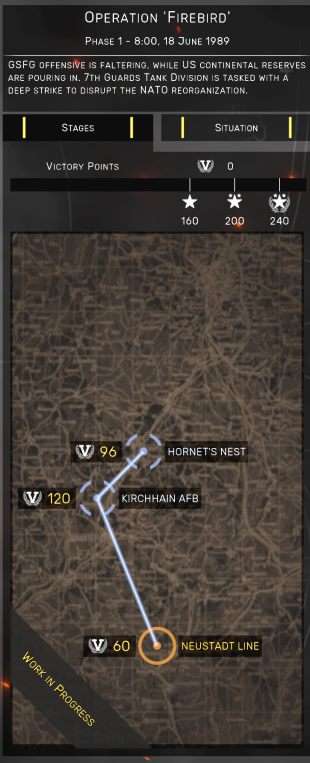
The briefing provides key information: the current situation in and around the operational area, the key objectives of each Stage of operation, and the Time limits you’ll have to adhere to.

Difficulty level determines the starting resources and the strength and quality level of the opposing forces.

Each Phase is saved separately, allowing you to backtrack and replay the Operation from any given point. Keep in mind though, this will currently overwrite the Phases ahead of the one you’re playing. A ‘dry run’ option may appear in the future.
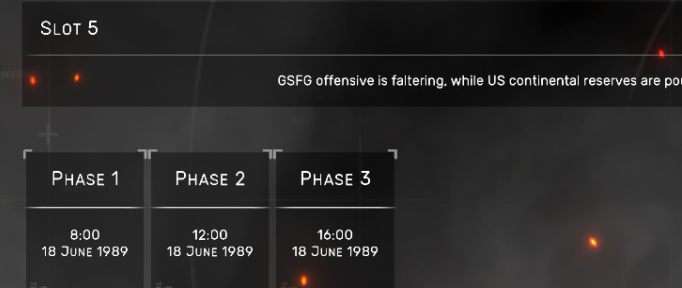
A single Phase consists of preparations and combat.
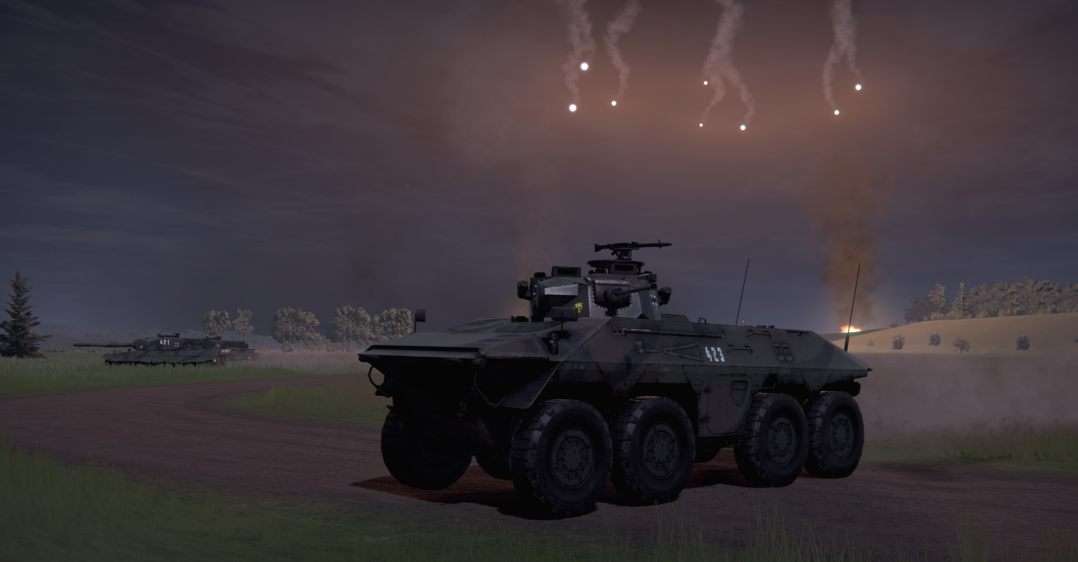
During the pre-battle segment, you can spend Operational Authority to ready your regiment for the coming fight. You then select the Phase Event and proceed to the battle. The Phase battle itself lasts for 20 minutes. The key difference from Skirmish is that all zones are connected, forming a network – you can only capture a node if you already possess an adjacent node.
Nodes may have a Victory Points value assigned to them. Holding and taking such nodes is crucial to the success of the Operation. Consult with the Mission Task panel to see whether you need to take or hold such a node. “Take” nodes will provide their VP value when you advance to the next stage. “Hold” nodes will provide a set amount of VPs each phase you’re controlling them.

A Node with 30 VP value
Other nodes will grant Operational Authority – they are secondary objectives. Not required, but very beneficial. Typically, during the offensive stages of the Operation, all such nodes are “Take” type – and “Hold” during defensive ones.

A Node with 125 OA value
The third type of node is the Exit node. Some Stages will require you to capture an exit to the next one. As soon as you control at least one Exit Node, you can use the pre-battle Stage Map to advance to the next stage.

An Exit Node
At the start of the battle, you may get an opportunity to deploy your platoons in forward positions. If any nodes are eligible for deployment, you’ll see a blue overlay around them, designating the valid deployment area.
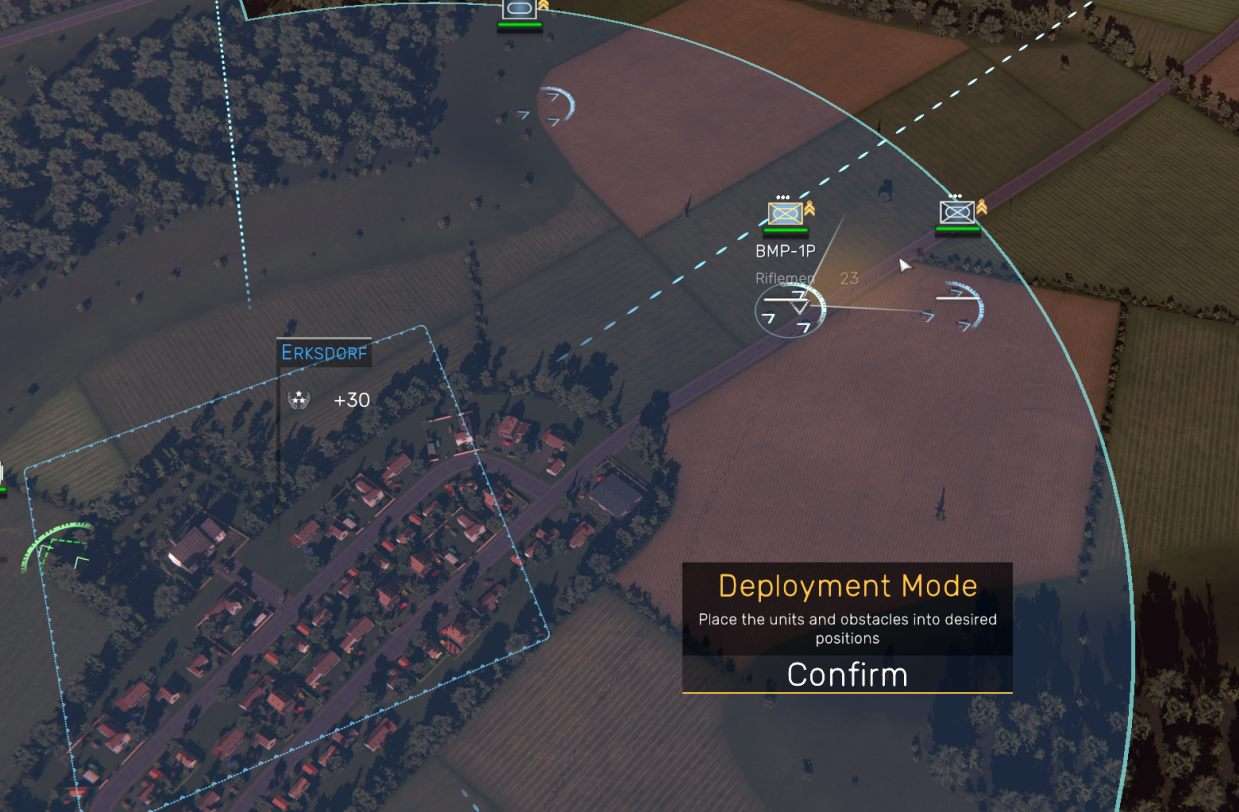
Depending on the stage, Deployment rules vary.
Typically, in offensive situations, you can’t deploy around the border nodes – i.e. nodes that are connected to an enemy or neutral node.
In defensive stages, border nodes are valid deployment zones. Also, your deployed platoons will start entrenched – even the platoons that don’t normally entrench themselves, like tanks. When you’re satisfied with the positioning, click the Confirm button.
An option to undeploy a platoon may appear in future.
Rear-area troops will also deploy token forces to the nodes you control at the start of the phase.
In addition to deploying your core troops, you can spend Engineer Support points (more on that below) to place mobility obstacles and strongpoints.
UX for strong points is very work-in-progress. Both placement and removal of elements is done by Left Mouse Button. During the placement of obstacles, you define the starting point and then drag out the line. To place strong point, you designate the position with the first click, strong point will then rotate toward the cursor – when it’s facing correctly, you confirm the rotation with LMB.
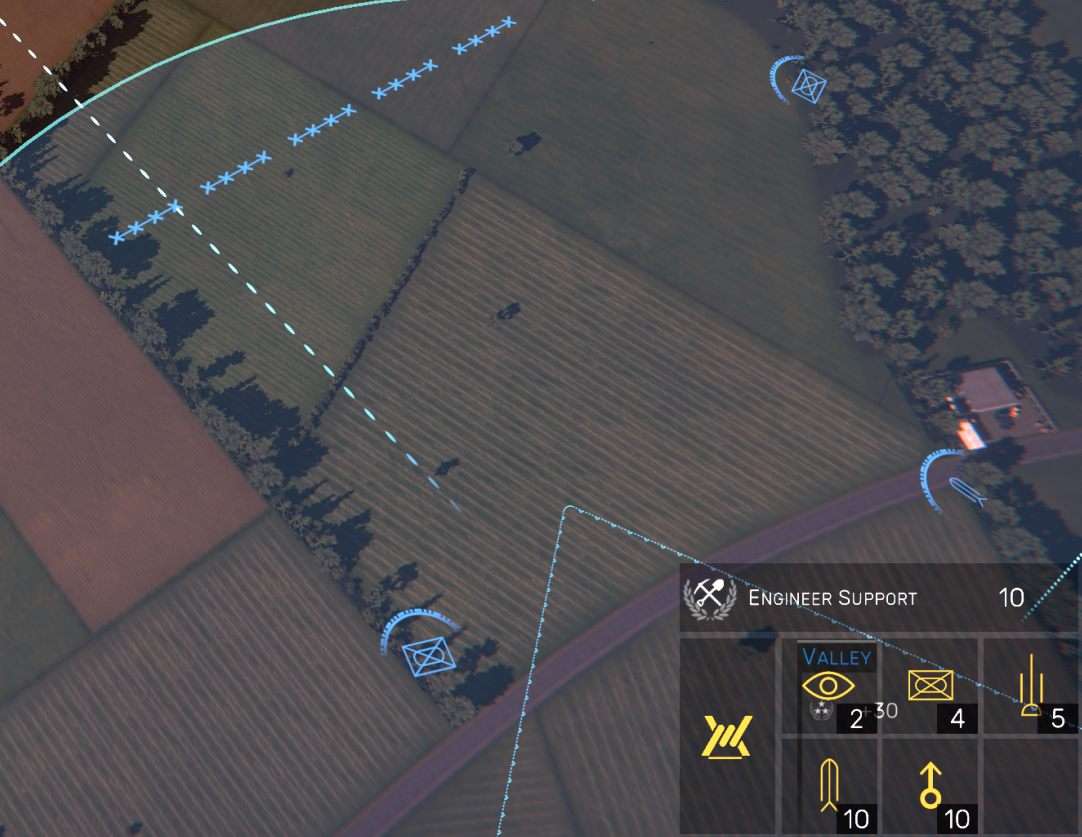
Mobility obstacles will block the passage of the opposite side’s troops through them.
Any platoon can eventually breach the obstacles, though dismounted infantry and engineers do it much faster. Having several platoons working on the same segment also speeds up the process.
Strongpoints are static & entrenched specialized unit sections: recon listening posts, infantry strongpoints, anti-tank, anti-air and mortar emplacements.
A destroyed strongpoint has a 50% chance to be restored at the start of the next phase. All surviving strongpoints will be fully refunded when you advance to the next stage.
Between the phases, you’ll manage the state of your force via the Regiment Management screen. It allows you to review the current situation and spend Operational Authority to reinforce your Regiment.
The info panel to the right contains two tabs:
- The first one displays the current Stage progress and the Victory Points left unclaimed on each stage. If the exit conditions have been satisfied, you can use it to advance to the next Stage – by clicking on the next stage’s icon.
Keep in mind – moving to the next Stage will forego any unclaimed VP and OA nodes.
Stage can also advance automatically, if the attacking side possesses all nodes on the map.
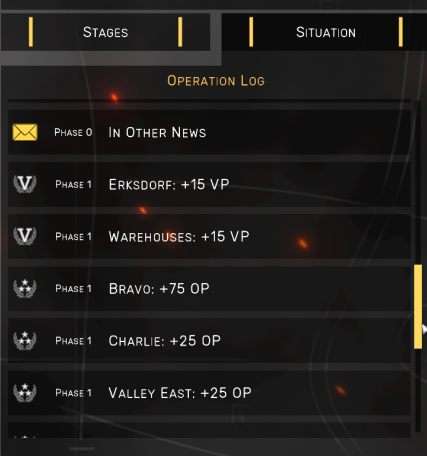
- The second tab contains OpLog. It allows you to review the VP & OA gains from the zones you hold or have captured. It also contains messages about the current situation in your operational area and outside it.

The main panel in the center allows you to manage the Regiment itself.

Operational Authority is the core currency and can be used for a variety of purposes.
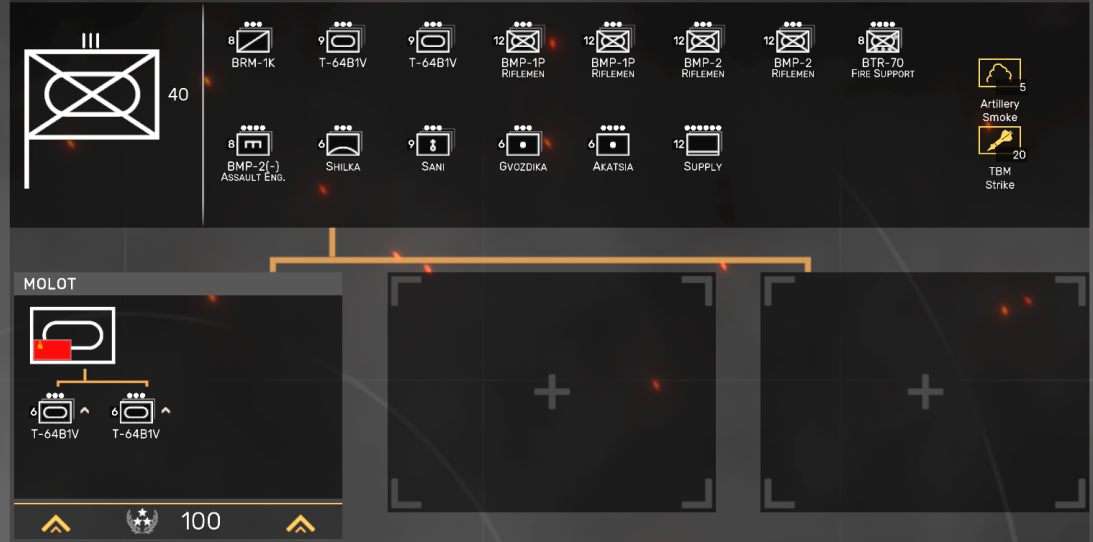
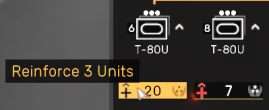
- 1) Restore the depleted companies. In Operations, the unit count is limited. Each platoon stack displays the number of units it has to the left of its icon. Losses will reduce that number: eventually, you’ll have to deploy understrength platoons and then lose access to the stack altogether. To avoid that, you can spend Operational Authority to reinforce stacks back to strength.
A button appears beneath each platoon stack, displaying the amount of OA it’ll take to restore a single-platoon-worth of units.
- 2) Order new Task Forces. You have 3 Task Force slots available – click on them to move to the Task Force selection screen. You can hover over the TFs there to see their upgrade paths.
- 3) Upgrade an existing Task Force. Upgrades provide access to more and better units and new TacAid options. Remember that the upgraded platoons will be undeployed from the map, as they receive new equipment.

All platoons have a fixed Deployment price, based only on their base type: Armored, Mechanized, Motorized, etc. Upgrades don’t change base type, so you won’t suddenly find yourself unable to field the same force you had before the upgrade.
OA can also be exchanged for other resources.
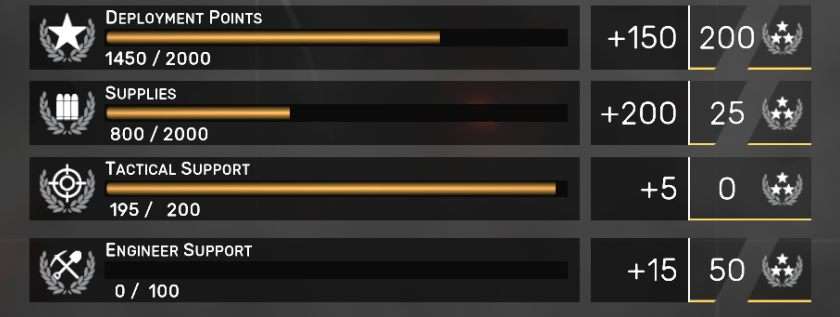
Deployment Points increase the maximum amount of platoons you can deploy during the battle. DPs are never permanently lost under any circumstances and will be always restored to the current maximum value.
Supply Points are used to refit your platoons during battle. Keep in mind that artillery and helicopters use up Supplies at a much higher rate than other units. Platoons that retreat off-map also use up Supplies to restore ammunition levels. Even if you run out of supplies completely, emergency resupply will restore 25% ammo for core combat units – still, it’s a critical situation and severely limits the time platoons can fight effectively. Avoid it and try to keep at least a small reserve of supplies.
TacAid Points work as usual and allow you to call TacAids. Request more TA points if you plan to use a lot of off-map support during the phase. Unlike Skirmish, the TA point cap in Operations is at 200 points.
Engineering Support allows you to place obstacles and a variety of strongpoints. You can do it during the pre-phase deployment stage. Engineers can work only inside your deployment areas. A destroyed strongpoint has a 50% chance to be restored at the start of the next phase. All surviving strongpoints will be fully refunded when you advance to the next stage.
If you change your mind, you can use the ‘Discard Changes’ button to revert all the changes and re-distribute Operational Authority.

After you’re satisfied with the condition of your Regiment, it is time to determine the Phase Event. Phase Events represent various contingencies that happen outside of your direct control as a Regimental commander.
Events come in a hand of 4. The next hand is dealt only if the current one is empty.
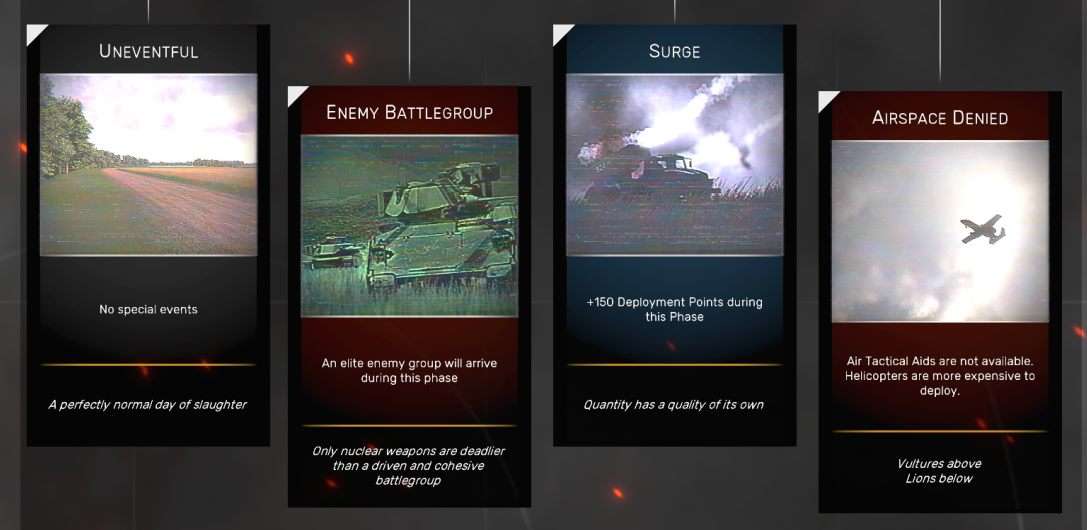
In the Chaos event mode, the next event will be selected randomly. Chaos mode is not currently available but will be added as an optional rule later.
In the Narration event mode, you get to select the next event yourself.
You can review the Phase Event in combat. Move the cursor over the card icon near the Mission Task panel. Some events have delayed execution: a timer will show when the event will take place.

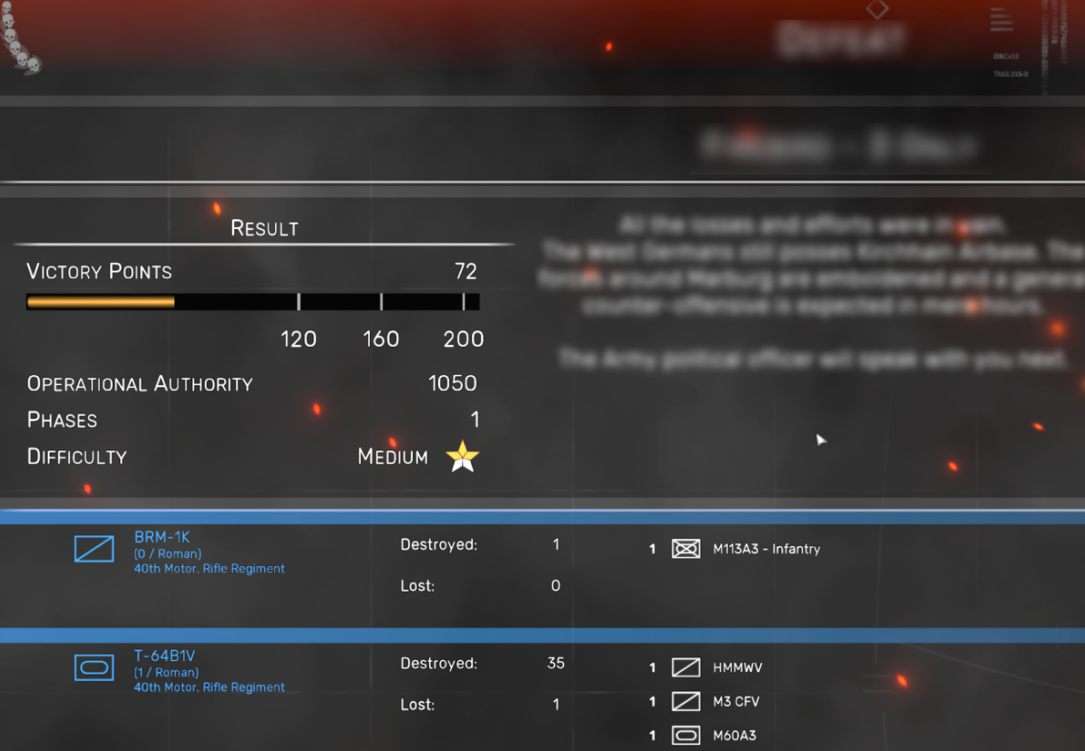
Victory is determined by the number of Victory Points you possess at the end of the Operation. Post-Operation results screen allows you to review the final stats, the butcher’s list and the performance of each company in your Regiment.
This screen can be accessed through the Phase Save List screen.
Be the first to comment