
Ву Alexander The Grape.
So you’ve learnt the meta, refit your fleet, built cracked new ships and are ready to dominate the seas. Here’s how you actually use the damn thing.
The Naval interface is clunky and unintuitive, but with this guide you’ll soon be handling it as well as the sweatiest LARPer.
This guide will also give you the skills to master the four main strategic goals navies can be used for.
- Gaining Naval Supremacy to allow your naval invasions.
- Gaining Shore Bombardment and its powerful stat debuff on coastal tiles: up to -25% to enemy attack, defense and breakthrough.
- Performing Convoy Destruction to control the flow of divisions, supply and resources (Note: Raiding with anything other than Submarines is currently banned in many MP servers, including Red Baron).
- Engaging in Naval Battle with an enemy fleet in an attempt to destroy it. This will prevent the enemy gaining the other benefits.
This guide will take you through how to organise and give missions to the Fleets, Task Forces and Ships that make up your navy, and then how to perform each of these four key goals to win control over the seas.
- Land warfare is fought with Divisions.
- Naval warfare is fought with Task Forces.
Divisions are made up of Battalions. One or more Divisions make an Army. An Army is commanded by a General.
Similarly, Task forces are made up of Ships. One or more Task Forces make a Fleet. A Fleet is commanded by an Admiral.
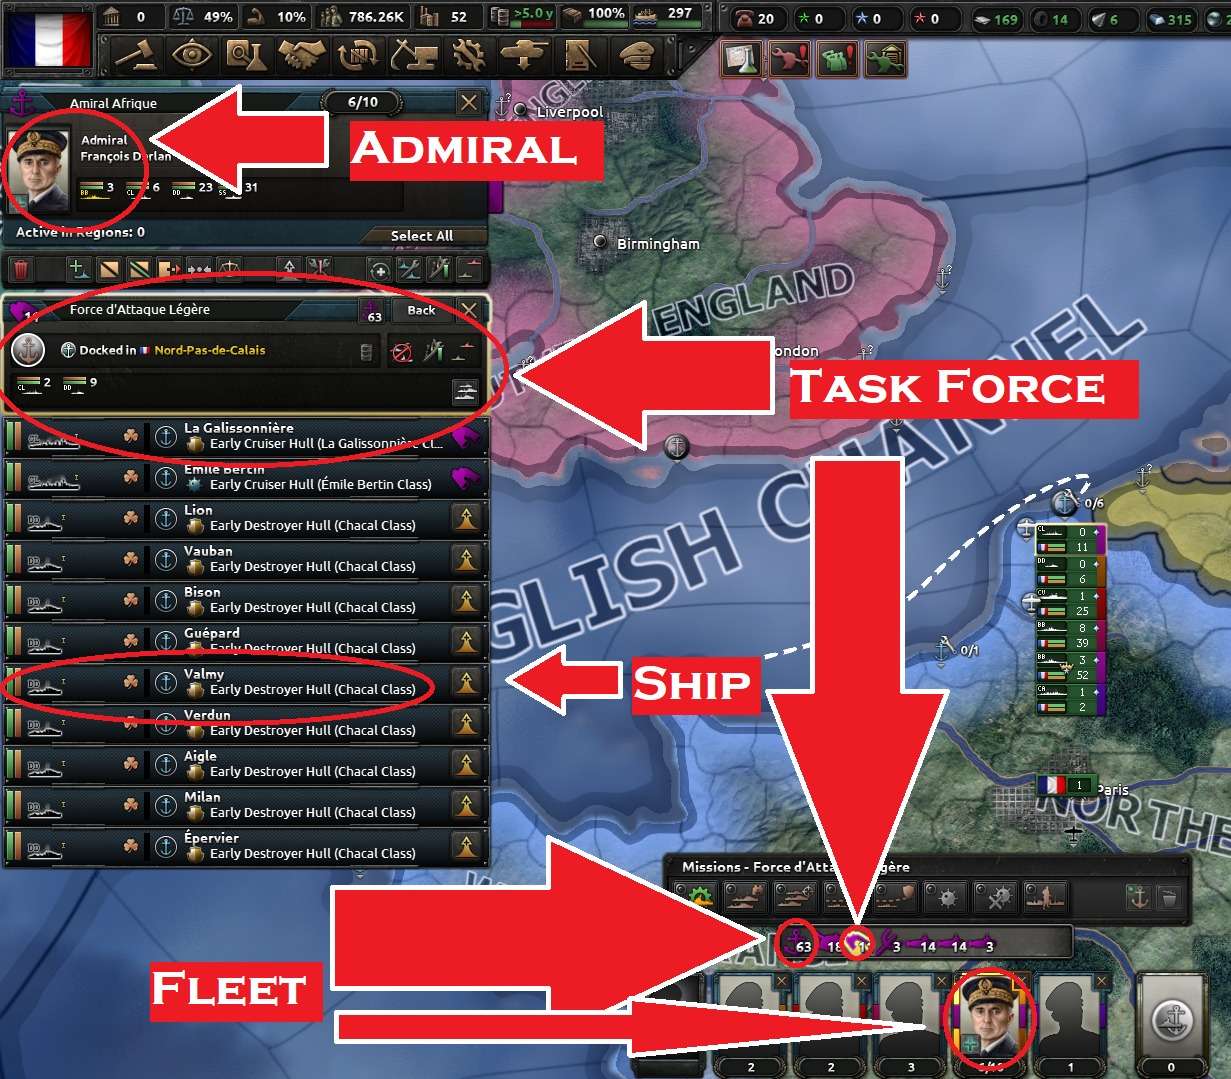
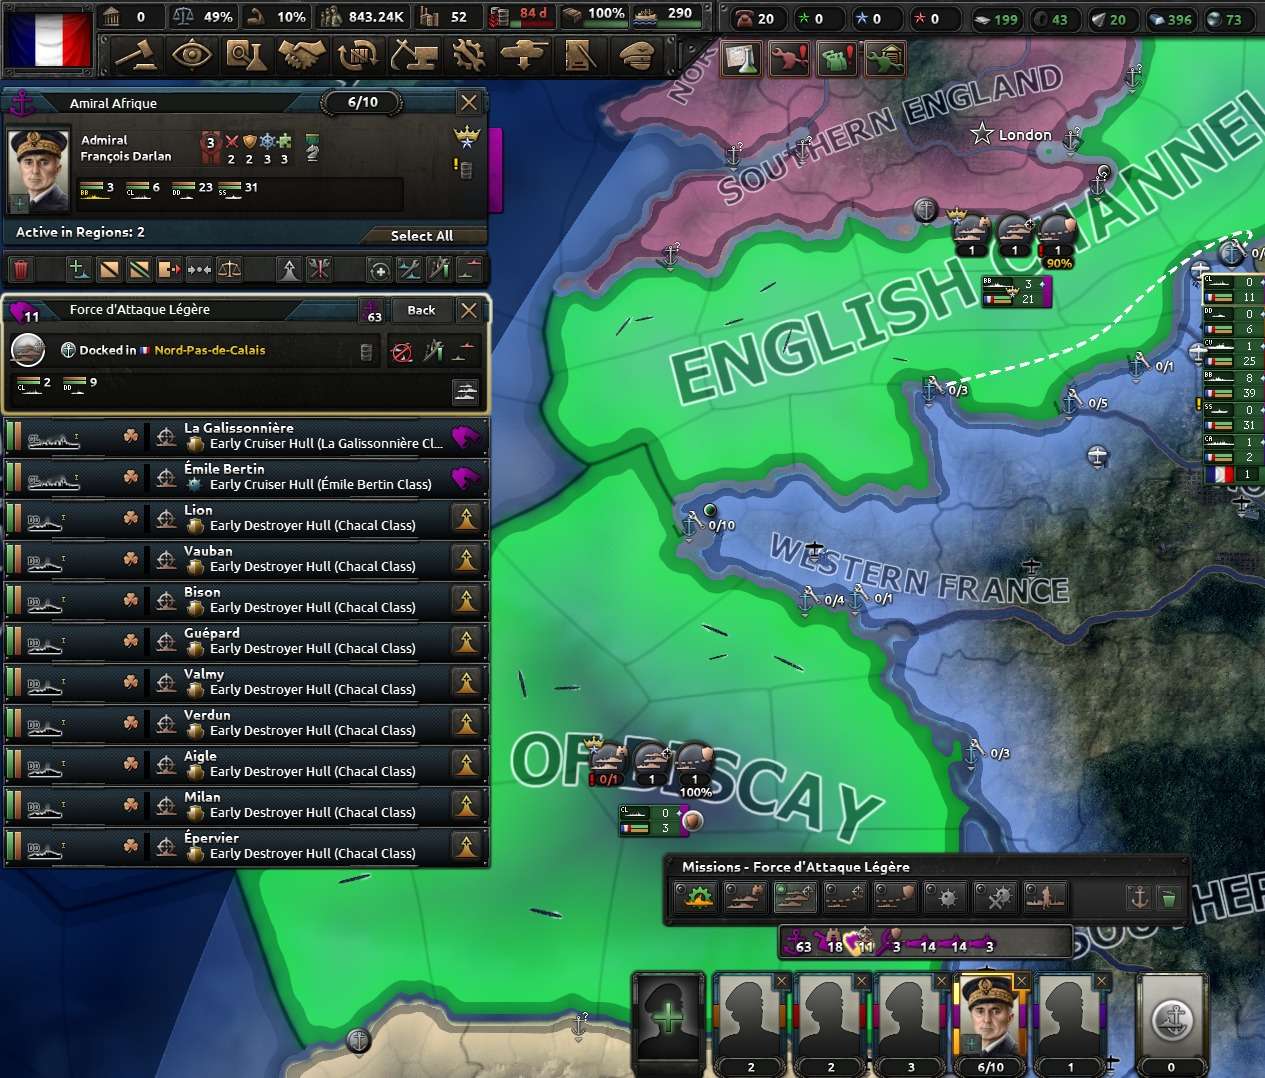
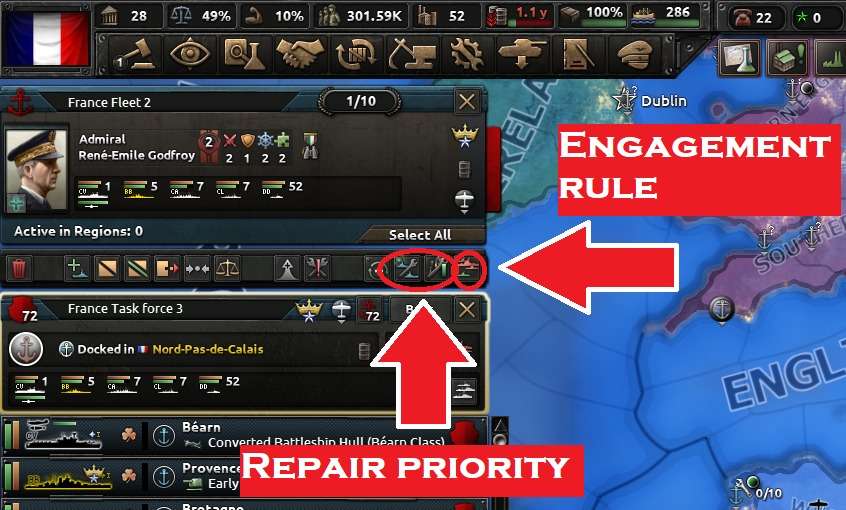
UI explainer showing a Task Force selected in a French Fleet.
You can move Task Forces between Fleets much like you move Divisions between Armies: simply select the Task Force within its Fleet, then RIGHT CLICK on the icon of the new fleet.
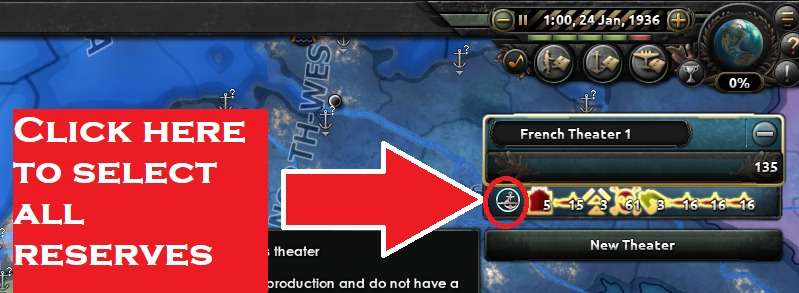
Newly built ships will go to the “Reserves” fleet. You can move task forces into or out of “Reserves” like you would any other fleet.
Merging
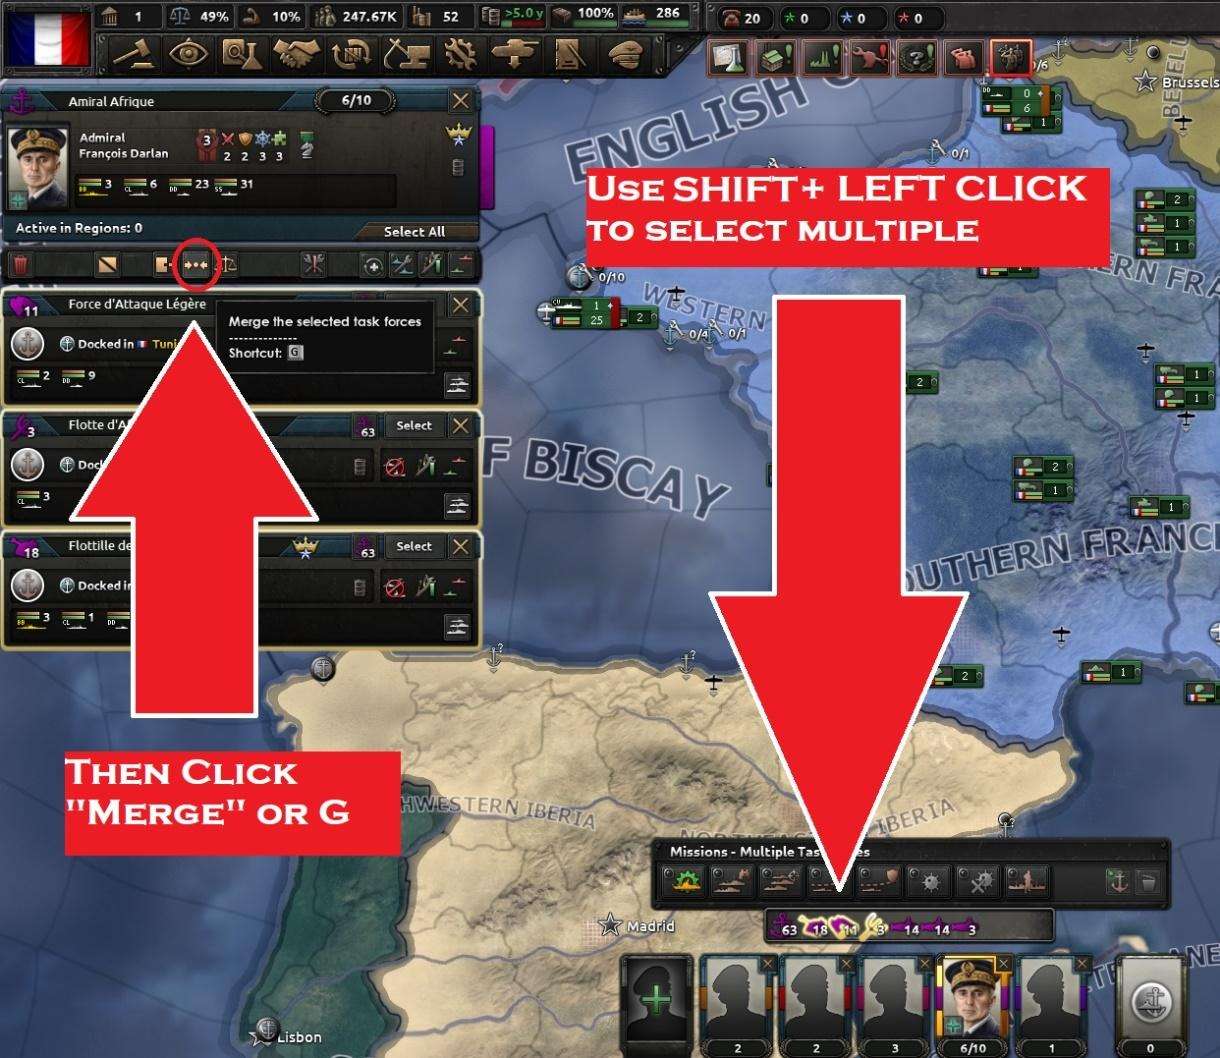
Unlike with Divisions, you can easily merge Task Forces together to make them bigger and stronger. There is no maximum Task Force size. To merge multiple Task Forces together, select multiple Task Forces in the same Fleet at once with SHIFT + LEFT CLICK. Then Click the “Merge” button at the top left of the screen, above the list of ships.
If you need to quickly consolidate your entire fleet, hold SHIFT and click on all the admiral icons to select all fleets. Then right click Reserves right of admirals to move them all to reserves. Once this is done, click the Reserve icon on the upper right hand panel to select all. Then, hit G or the merge icon to merge. You can then left-click the new admiral icon to move all ships to the same new fleet.
Splitting
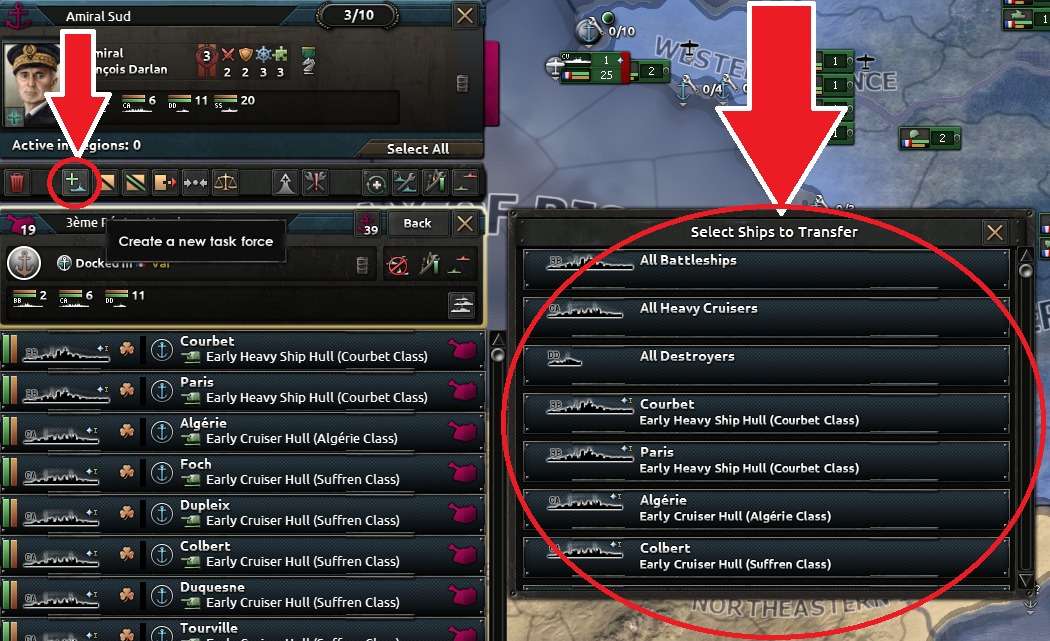
You can also split off ships into new Task Forces. To do so, simply click the green “+” icon at the top of the task force ship list, then select the ships you want to split off. You can select individual ships, or all ships of a given type (IE all Light Cruisers).
If you have ships selected in the task force ship list prior to clicking the green “+” icon, those ships will be immediately split off into the new task force. SHIFT + LEFT CLICK to select multiple ships.
This can be used to select all ships of a specific design and split them off. Simply double-click on the ship model you wish to split off to select them all, then click the green “+” icon.
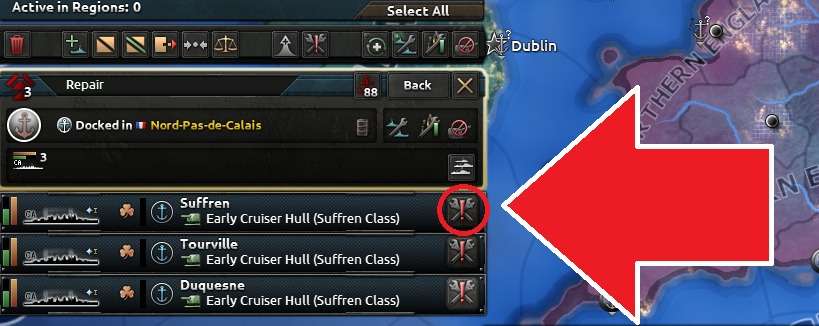
You can also manually split off to repair with a single click. LEFT CLICK the “Repair Now!” button with the crossed wrenches beside the damaged ship. The ship will detach and move to repair.
Click “Repair Now!” to easily order repairs of individual ships.
Assigning Missions
- To control your Army, you issue move orders to Divisions.
- To control your Fleet, you issue missions to Task Forces.
So how do you issue missions to Task Forces? Think of missions like the naval equivalent of a Guard order for your army – continuous operations in a selected area.
When you get an army to garrison an area with a Guard order, you select the army, then select the Guard order button, then use right click to “paint” all the areas you want garrisoned.
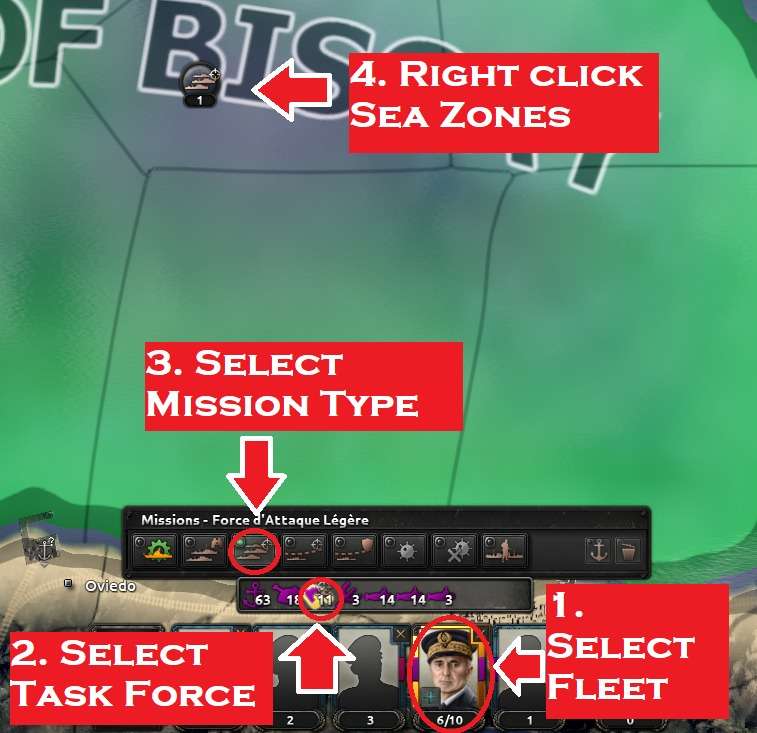
Missions work the same way. You tell the Task Force what to do by left clicking the mission type, and then you “paint” an area on the map with right click to tell the Task Force where to do it.
- Select the Fleet by left clicking on the Admiral’s portrait in the bottom of the Naval view.
- Select the Task force by left clicking its icon.
- Select the Mission Type by left clicking the mission button
- Assign Sea Zones by right clicking to “paint” the areas you want
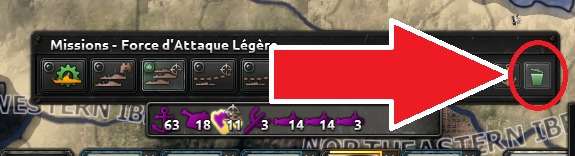
If you need to unassign sea zones, then hold shift + right click on the sea zones you no longer need, or click the bin icon in the mission menu before clicking the unneeded zones. You can also right click the bin icon to unassign all sea zones.
Task Forces in the same fleet always have the same mission areas. But they can do different missions. So for instance, if you have the English Channel and the Bay of Biscay painted, then all task forces in that fleet will perform any assigned missions in those zones. However, each can be on a different mission. So one Task Force could be on Patrol, another could be on Strike Force, while a third could be on Convoy Escort.
As part of the same fleet, these three task forces share the same mission areas, but can perform different missions.
Mission Types
There are 9 missions types:
- Naval Exercises spends Fuel, reduces Organsation and risks damage to ships to gain those ships experience and grants you naval XP. It is advised you train your ships before war, as training fleets are vulnerable to attack due to low Organisation.

- Patrol sends the ships out hunting for enemy vessels and if their Engagement Rule is high enough, will engage them once found. It is recommended to only Patrol in 1 sea zone per task force. The speed and effectiveness of the Patrol mission is dependent on the Task Force’s average Surface Detection, Speed, the Weather, Radar and how many friendly aircraft are active in the area.

- Strike Force will cause the Task Force to stay in port, sailing out to attack enemy vessels and defend friendly vessels that are spotted or engage in the designated zones. This mission is a good way to gain Naval Supremacy – see the later section – as this is one of the few missions that consumes little Fuel most of the time. Note that STRIKE FORCE causes the Task Force to defend only friendly ships and troop convoys, not trade or supply convoys.

- Convoy Raiding will assign the Task Force to find and attack enemy trade, troop and supply convoys. Finding convoys, like finding ships, is dependent on average Surface Detection, Speed, the Weather, Radar and how many friendly aircraft are active in the area. Currently, Convoy Raiding with ships that aren’t submarines are banned in many servers.

- Convoy Escort will make the Task Force follow friendly trade convoys, trying to defend them from attack.

Minelaying lays mines – it is currently banned in most servers. Minesweeping destroys enemy mines.
- Naval Invasion Support escorts naval invasion troop convoys and assigns the Task Force to give Shore Bombardment to allies. If there are no battles to support, or invasions to escort, the fleet will remain in port.

- Hold tells the Task Force to stop in a particular spot. You can use this order to move the Task Force to specific sea tiles. Selecting this mission costs the fleet a significant amount of its Organisation.
You can also use the Hold mission to join an ongoing naval battle. Simply CTRL + RIGHT CLICK on the tile with the battle to join it. Beware, doing so will cause your fleet to lose Organisation!

While performing the Hold, Strike Force, and Naval Invasion Support, missions you can also move between friendly ports. Simply right click on the destination port with the Task Force selected. Your Task Force will move straight there, even if this is outside the Task Force’s operating range.
Engagement Rules and Repair Priority
The Task Force’s AI will decide when to attack, retreat or repair based on the Engagement Rules and Repair Priority at the top of the ship list. You can click the icons to toggle through the options.
Engagement Rule determines if ships will fight or retreat. This ranges from “Never Engage” (never attacks, always retreats entire task force) to “Always Engage” (always attacks when possible, never retreats entire task force).
Repair Priority determines if ships will avoid combat to repair when damaged. This ranges from “Never Repair” (ships will only repair if commanded to via the “Repair Now!” button) to “Repair Priority – High” (ships will repair when only lightly damaged).
Repair Priority has a toggleable option – Automatic Split-off. When enabled, damaged ships will automatically leave and repair according to the set Repair Priority level. When disabled, the Task Force will return to port if one or more ships are damaged beyond the Repair Priority threshhold.
For most purposes, your main surface Task Force should be on “Always Engage” as the Engagement Rule and “Never Repair” as its Repair Priority, with Automatic Split-Off Disabled. This ensures your fleet does not run away from a decisive battle. If you need to, you can always manually retreat.
Here are suggested Engagement Rules and Repair Priorities for different Task Force roles:
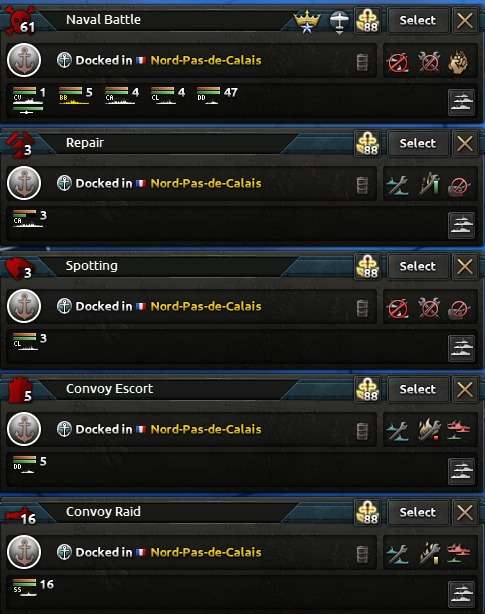
- Naval Battle (Patrol Mission): Always Engage, Never Repair, Automatic Split Off Disabled
- Repair (Hold Mission): Never Engage, Repair Priotiy – High, Automatic Split Off Enabled
- Spotting (Patrol Mission): Never Engage, Never Repair, Automatic Split Off Disabled
- Convoy Escort (Convoy Escort Mission): Engage at High Risk, Repair Priority – Low, Automatic Split Off Disabled
- Convoy Raid (Convoy Raiding Mission): Engage at High Risk, Repair Priority – Medium, Automatic Split Off Enabled
Now you’ve learnt how to organise and utilise your navy, let’s learn how to pursue its four main strategic goals
- Risk – Low
- Benefit – Control who can naval invade
Naval Supremacy represents how confident your troops and generals are in the strength of your navy to defend them. If a much bigger enemy fleet is ready to blow their transports to pieces, they won’t launch!
You could have them court martialed for cowardice, but it’s better to learn how to get Naval Supremacy. Naval Supremacy is represented by a number, typically in the 10,000 – 50,000 range for large fleets. This is then compared to any enemy supremacy and translated into a percentage.
If your Naval Supremacy value is bigger than the opponents (>50% supremacy) in a given sea zone, then you can launch naval invasions through it and they cannot. All sea tiles the naval invasion passes through must be on 50% supremacy or more the moment the invasion launches for it to start.
To gain Naval Supremacy, assign your fleet the Strike Force or Naval Invasion Support mission in the sea zones you want to gain supremacy in. Make sure your fleet is within 3 sea zones of these, and is not on “Do not engage” Engagement Rule or repairing.
Strike Force (Left) and Naval Invasion Support (Right) are the best missions to gain Naval Supremacy whilst safely in port.

The Patrol mission also provides supremacy, but only in one sea zone at a time and with a heavy fuel cost. Other missions, like Convoy Raiding and Convoy Escort provide half the amount of supremacy.
To gain more supremacy, gain Air Superiority over the sea zone to gain an up to +100% bonus. Reach at least 40% naval intel on your naval opponent with infiltration, spy planes, naval department and intel missions to avoid supremacy penalties.
Be wary. While Task Forces on Strike Force won’t defend trade or supply convoys, they will sally forth to defend threatened troop convoys and other Task Forces in their assigned regions. This can potentially draw you into an unwanted battle.
Task Forces on the Naval Invasion Support mission will also come out to escort naval invasion troop transports and provide Shore Bombardment in adjacent zones.
If you don’t want to risk your fleet, only engage these missions when you need to launch the invasion, and cancel them immediately after.
To counter an enemy’s supremacy on Strike Force, you need to either bring a bigger fleet, gain air superiority or Port Strike them into retreating or repairing.
Most Naval Supremacy score comes from IC (cost) and manpower. The most cost effective ships for gaining supremacy are the ones with the highest manpower per cost –Carriers, Battlecruisers and Battleships.
Strategic Goal – Shore Bombardment
- Risk – High
- Benefit – up to -25% to enemy ATTACK, DEFENSE and BREAKTHOUGH in neighboring land battles.
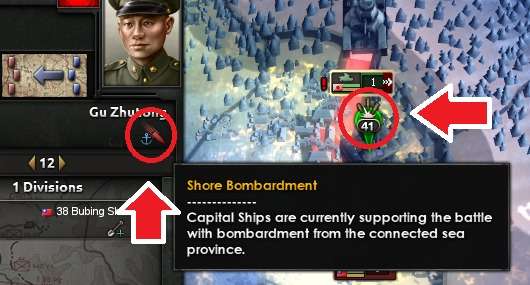
Shore Bombardment is among the most powerful debuffs you can impose on your enemy. Each 10 points of Heavy Attack or 20 points of Light Attack on your fleet will add a -1% penalty to enemy stats in all adjacent provinces, up until the maximum of -25%.
The downside is that Shore Bombardment is extremely obvious. The distinctive bombardment icon on the combat “bubble” and the naval bombardment icon in the battle screen will both immediately telegraph the location of your navy to the enemy, so be prepared for battle!
Battleship bombardments are not subtle.
To force-move your fleet at a sea tile to Shore Bombard, first select the Task Force by clicking on the Fleet in the naval map view and clicking on the task force icon. Then, hold CTRL and RIGHT CLICK on the sea tile you wish to move to. This costs your fleet a temporary penalty to their organisation.

Strategic Goal – Convoy Destruction
- Risk – Very High
- Benefit – Interrupt enemy trade, naval invasions, supply and troop movement
If you need to transport troops, resources and supply across the seas, you are reliant on Convoys. If you are able to intercept and destroy your enemy’s Convoys, their war machine can ground to a halt.
There are two main strategies for destroying enemy Convoys. Both of these use the Convoy Raiding mission: Convoy Raiding with surface ships (surface raiding), and Convoy Raiding with Submarines (Sub raiding).
Note: due to a bug with naval hit chances, surface raiding is currently banned in many servers.
For either mission, the chances of finding convoys are improved by Surface Detection, Naval Speed, air cover, radar and weather. To maximise convoy interdiction, use a large number of smaller task forces. Once the Convoys are found, Light, Heavy and Torpedo attack are all effective at destroying them.
Sub raiding is most effective in areas of deep ocean away from enemy air cover. Sub raiding is good at evading enemy surface ships but is vulnerable to land-based Naval Bombers. It is most efficient when performed in multiple stacks of 5-15 subs each.
Surface raiding is most effective when the enemy fleet is no longer a threat. Surface Raiding has the AA and HP to withstand air attack but is vulnerable to defeat when isolated raiding stacks are attacked by a larger enemy Task Force. For this reason, Surface Raiding often uses only one or two Task Forces. To improve average surface detection, split off low Detection ships like Destroyers and have them Strike Force the raiding area to reinforce as needed.
Successful raiding will continually reduce enemy “Convoy Efficiency” in the sea tile, preventing supply and tradeable resources from passing through it. Any troop transports sunk will also strength-delete the divisions they belong to.
Raiding is a powerful counter to unescorted naval invasions. Attacking unescorted troop convoys, if successful, can completely wipe out an invading force.
For maximum efficiency, raid at most 1.5 sea zones per Task Force. So if you have 4 task forces in a raiding fleet, you can raid up to 6 sea zones simultaneously.
Due to the vital nature of sea trade and transport, the enemy will likely dispatch their fleet and airforce to counter your raiding. Be ready to retreat, switch zones or fight as need be.
To counter enemy sub raiding, deploy large numbers of Naval Bombers and other aircraft in a single Air Zone to maximise detection. If that is not possible, small task forces of 10 or so Destroyers can be assigned to Convoy escort to stem the bleeding – but this is not a long term solution.
To counter enemy surface raiding, create one small Task Force of ships with high Surface Detection and the “Do Not Engage” Engagement Rule on the Patrol Mission per vulnerable sea tile. Then, deploy a fast and powerful fleet nearby on Strike Force over the same zones. Once the patrolling ships spot the enemy surface vessels, your Strike Force fleet will sally forth to engage, leading to a Naval Battle
- Risk – Maximum
- Benefit – Destruction of enemy capabilities, uncontested naval dominance, bragging rights
The most effective (and hardest) way to control the seas is by destroying your enemy in a decisive Naval Battle.
If an enemy Task Force is at sea, and within range, it can be attacked. Simply set the Patrol mission with the fleet you wish to engage with and the “Always Engage” Engagement Priority in the same sea tile as the enemy, and you will find and attack them.
To spot the enemy faster, set a single spotting ship to Patrol in the sea zone and “Never Engage” with the main Task Force on Strike Force and “Always Engage” nearby.
The outcome of Naval Battles is largely determined by Macro, not Micro, but you can still massively affect the outcome by remembering BOFA. What is BOFA you ask? BOFA deez
- Blob Up
- Org Up
- Fuel Up
- Air Up
Blob Up is getting every surface ship you can in the battle. Outside of Carriers and Subs, more is always better, so make sure every possible ship is engaging! If allied fleets are in the area, get them to engage alongside you by CTRL + Right clicking on the ongoing battle with the Task Force.
Org Up means ensure your ships are at maximum Organisation before engaging. This means cleanly swapping between missions. Never engage immediately after activating the Hold mission or after cancelling all missions, except in an emergency or when joining an allied battle. Low Organisation massively reduces hit chance and carrier air efficiency.
Fuel Up means ensuring you having sufficient fuel to last for a long engagement. Navies take massive amounts of fuel, and double as much in combat. If necessary, but emergency Oil on the trade menu or beg for a lend lease injection from your allies. Never fight if your tank is empty!
Air Up means fighting under as green air as possible. Land-based Naval Bombers can sink your Carriers and de-org your capital ships, meaning it grants a massive advantage to the side that gains air superiority. Let your AC know prior to the engagement, and have them move as many planes as possible over the battle. When a decisive Naval Battle Occurs, that should be the number one air priority. For this reason, try and engage close to your own airfields, and far from the enemy’s.
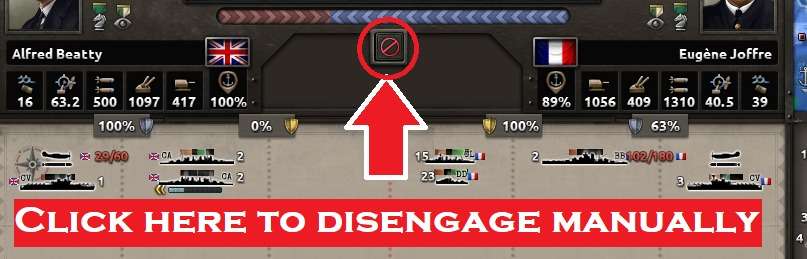
Finally, remember to manually deez-engage from the combat if you’re losing!
Anti Submarine
There are two main approaches to ASW but there’s no reason you can’t combine them, and in high impact scenarios you do.
The most common approach in modern MP is to bomb + escort. You use some of the UK’s starting destroyers (specifically the ABCD class, which you have like 30 of) to escort in all but one raided zone, and then you put medium airframe navs over one zone at a time.
You’ll kill subs really fast this way with 0 dockyard investment, so typically UKs relying on this strategy will get to make convoys all game forever, which really helps with supply + lend lease + moving troops around the world + trade. This approach sounds lazy but it absolutely works in most situations (and is way more efficient than what I’m sabout to describe).
Using your navy actively is the second. This is where there’s tons and tons of bad information. A lot of people recommend sonar and depth charges on destroyers. In reality, you can’t ever get enough sub detection on a destroyer, so you should just put depth charges on them and put them on strike force. The spotting is done by light cruisers with float planes and sonar for very high sub detection, and they need to be patrolling on “Do Not Engage.”
The strike force of destroyers (carriers are very good at this too) will jump on detected packs of subs and kill several of them in the initial hours. Once the subs can re-submerge and become invisible, you need to manually retreat your strike force from the battle and get it back into port. Sonar has 0 effect in battles – it only helps your cruisers detect outside of battle. Once in battle, subs are 100% invisible until revealed by their own attacks, and that’s purely RNG.
Be the first to comment